Welcome to adobo-down-under!

Musings. Family. Food. Stories. Cooking. Recipes. Eating. A recipe journal. From simple Filipino dishes to challenging recipes and exciting gastronomical failures. This is for my girls to look back on for comfort, memories, laughs, love and lots of food!

Wednesday, March 30, 2011

Brownies with an impressive resume

These brownies were made following an aftermath of baking for the Election Fete.  I find it comforting and warming when the kitchen oven starts buzzing as the weather becomes cooler.  And I guess baking brings out that warm fuzzy feeling when the house smells of chocolate or bread or the smoke from the exhaust on the roof shouts the flavours of the hour.

I have been a fan of David Lebovitz for some time now.  I have just finished reading his book The Sweet Life in Paris.  Funny and entertaining, the book also made me hungry.  As I read through the book on his adventures in Paris, I also read through each of the recipes.  They are unique and also familiar at the same time. Most of David's recipes are familiar dishes with flair, that only one who has worked for Chez Pannise for many years would undoubtedly acquired.  David's flair not only comes out in his writings, his blog, but more evidently, in his recipes, his photography, his adventures and recount for each and every one.  I always read his blog and am a fan of him in FB.

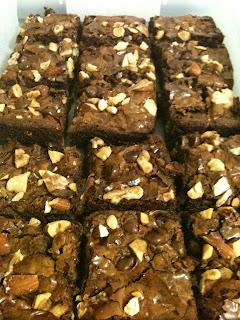
As I don't have David' book Ready for Dessert I was lucky to have found the recipe from La Mia Vita Dolce, and aptly so, the photos are just as inviting.  The day I found the recipe was the day I made these.  And these are just absolutely, the best brownies I've ever tasted.  It is one of those sweets that when you taste you're jaws will drop in awe.  Truly.  And I only used basic supermarket variety ingredients.  Besides the taste, this brownie recipe is also the easiest to make.  Sort of like a one-pot-wonder or that Martha Stewart one-bowl-wonder cupcakes.  Brilliant brownies with an impressive resume.


In just 2 days, mum's made 3 batches of this brownie recipe already.  Also took some when I visited an office colleague at the RNSH.  Mum's even posted the recipe print out taped on the shelf in the kitchen. I'm also secretly planning on framing the recipe and hang it on the kitchen walls.  That easy.  That good.  That sacred.


Here is why I say its an easy recipe.  The butter and chocolate is mixed together with a spatula in a saucepan over low heat.


The sugar is then added and whisked until well combined.


Next, the eggs are incorporated one at a time whisking after every addition until smooth.  And then the vanilla is added and whisked into the batter.


Next, the flour is sifted into the batter using a fine mesh sieve, whisking for 1 minute until the batter loses its graininess and becomes smooth and glossy, and pulls away from the the sides of the saucepan.


Lastly, the chopped nuts are added and stirred with a wooden spoon to combine.

The batter is then poured from the sauce pan to the prepared (lined and greased) baking pan, and baked in a 175 degree Celsius pre-heated oven.  Wait for 30 minutes and this mouth watering brownies will rule over your life forever. 

Mum tried 2 brands - the Cadbury turned out a lighter colour than the Nestle Plaistowe, but the Cadbury brownies recruited more fans at home.


To make David's absolute best brownies:

6 tbsp (3 oz/85g) unsalted butter, cut into pieces

8 oz (225g) bittersweet or semi sweet chocolate, chopped
3/4 cup (150g) caster sugar
1 tsp vanilla extract
2 large eggs, room temperature
1/4 cup (35g) all purpose flour
1 cup (135g) walnuts, almonds, hazelnuts or pecans, toasted and coarsely chopped
(Mum all of these 4 varieties of nuts)

When Mum made these, my appreciation for our digital scale has been moved up one notch higher.  I realised its better to weigh than wash so many measuring cups!  Just one of the joys of making this brownie recipe!


Monday, March 28, 2011

Blueberry buttermilk bundt cake


Busy week for us. Election weekend. Mowbray PS fete which meant baking for the cake stall, plus as parents of the school community being part of the in one of the many stalls of the day. Mum was at the flower stall for a few hours, learning a thing or about local Australian flora, while you guys were out and about and enjoying the rides, the dog race, lollies and the overall buzz of this year's fete. It was a big fund-raising event and the Year3 mums did an absolutely fantastic job. I must say, its a big fete to follow as its our turn next year - Year3 parents are incharge of fundraising every year at Mowbray PS.

But anyway, the weekend was full on because we headed off straight to the Blue Mountains after the fete. Ate B had a game in Katoomba the next day at 10am and as it had been raining every day for a week already, mum thought it was just smart to stay overnight in Katoomba than driving early in the morning on a wet and foggy Sunday. No way. Dad had to work on Sunday so it was just us girls. Despite the chaotic start to the day, it ended cool and calm, and everyone relaxed. We had a lovely place to stay at 3 Sisters Motel in Katoomba, a short walk to Echo Point.
This cake was actually inspired by 12 Tomatoes when they posted this Must-Make Raspberry Cake. After reading through the recipe and looking and the price of raspberries (they were $8 a punnet at the time), I thought blueberries were a better option. And so from raspberries, this Blueberry-Buttermilk Bundt Cake was born. Well, actually adapted from epicurious.com.


3 cups all purpose flour (plain flour)

1 tbsp baking powder

1 tsp salt

1 2/3 c sugar (mum used caster sugar)

3/4 c unsalted butter, room temperature

3 large eggs

1 tbsp grated orange peel
(I didn't add this so I don't know if it affected the overall taste of the cake. Next time this recipe is pulled off from my files, I'll try and add some and see how it goes)

2 tsp vanilla extract

3/4 c buttermilk

2 c frozen blueberries
(mum actually bought fresh blueberries and kept them in the freezer overnight)

icing sugar for dusting


1. Preheat oven to 180 degrees C (350 degrees F).

2. Butter and flour 10-inch diameter bundt pan.

3. Whisk flour, baking powder and salt in a medium bowl.
(This process is also similar to sifting the dry ingredients together. The first time I read about whisking instead of sifting is from Dorie Greenspan's book From My Home to Yours

4. Using an electric mixer, beat 1 2/3 cups sugar and butter in a large bowl until light and fluffy.

5. Beat in eggs, one at a time.

6. Beat in orange peel and vanilla.

7. Beat in dry ingredients

8. Beat in dry ingredients in 3 additions, alternately with buttermilk in 2 additions.

9. Fold in blueberries.

10. Pour batter into prepared pan. Bake until tester inserted near centre of cake comes out clean, about 1 hour.

11. Cool cake in pan on rack for 10 minutes. Turn cake onto rack and cool completely.
Can be made one day ahead. Wrap in plastic and store at room temperature. Transfer cake to plate, sift icing sugar over and serve.


This smells absolutely heavenly!

Sunday, March 27, 2011

Pineapple upside down cake

I have one word for when its an election year. Cakes! As it is an opportunity to raise funds for the school, every election year means a cake stall for Mowbray PS. Last year (August 2010), it was for the controversial Commonwealth Elections where the elected PM Rudd was ousted from his seat and replaced by now PM Gillard. There was a snap election if you can call it that, after the exit and last year's showcase from our kitchen was Marble Cake and a favourite Lemon Yoghurt Cake.

This year, with the NSW State Elections (Premiere Kenneally was voted out by Premiere O'Farrell by the way), mum decided to try new recipes. One cake came to mind - pineapple upside down cake. And another, an inspiration from 12 Tomatoes - a must-make raspberry (mum made it blueberry) bundt cake.

Aaahhh. Pineapple upside down cake. This is the easiest of all. And believe me, when I set my mind on pineapple upside down cake, I looked and compared more than a dozen different varieties.


This recipe is from taste.com.au but adapted from the magazine Super Food Ideas - June 2009, Page 70. Recipe by Kim Coverdale

440g can pineapple thins in natural juice, drained

125g butter, softened

3/4 c firmly packed brown sugar

2 tsp vanilla extract

2 eggs

1 1/4 c self-raising flour, sifted

1/2 c plain flour, sifted

1/2 c milk


For the caramel topping
75g butter, melted

1/3 c firmly packed brown sugar


1. Preheat oven to 180 degrees C / 160 degrees C fan forced. Grease a 6cm deep, 22cm round (base) cake pan. Line base and side with baking paper.

2. Make topping. Whisk butter and sugar together in a bowl until combined. Pour into prepared pan.

3. Pat pineapple things dry with paper towel. Arrange pineapple over caramel, pressing down into caramel. (You can tell from my photos that I used a slightly smaller sized pan 20cm hence the pineapple rounds had to halved)

4. Using an electrical mixer, beat butter, sugar and vanilla until light and fluffy.

5. Add eggs, one at a time, beating after each addition.

6. Add flours and milk. Stir to combine.

7. Spoon mixture over pineapple. Smooth top.

8. Bake for 50 minutes to 1 hour or until a skewer inserted into the centre of the cake comes out clean. Cover loosely with foil if over browning during cooking.

9. Stand in pan for 10 minutes.

10. Turn out onto a wire rack. Serve.


It is a gorgeous looking cake and tastes just as good as it looks. I only had a bit of it from the pan because from the cooling rack, it went straight to the fridge for the fete the next day.

Tuesday, March 15, 2011

Apple compote with Sauce A L'Anglaise

Apple compote with Sauce A L'Anglaise @ Kitchen 10, Lesson 6


I have never ever, in my life, have eaten cooked fruit. Aside from the Filipino banana-que (which is toffeed lady finger bananas skewed on sticks), I was a bit hesitant making this as I’m not a fan of cooked fruit, let alone fruit poached in wine reduction. But alas, like all new experiences could be good or bad, this was way out there. The good side that is! I am now a renewed fan of any cooked fruit for dessert!

Plus this L’Anglaise Sauce was so worth the whisking and the waiting. While my effort was successful than some of the classmates (it could easily split – the egg and the sugar and the cream could magically separate in a span of seconds if you don’t focus and make this few minutes all about L’Anglaise. Woot, woot! What a combination!

Apple compote also refers to stewed apples. Compote is a dessert originating from 17th century France made of whole or pieces of fruit in sugar syrup.

A L' Anglaise on the other hand is also known as Creme Anglaise which is actually French for English cream.


Adapted from the Organise and Prepare Food, Methods of Cookery Series 3, here is the recipe for Apple compote

4 apples (Granny Smith apples are better options)

50g caster sugar

1-2 sticks cinnamon

1 clove

10 ml white wine

1/2 lemon juice


1. Peel and core the apples.

2. Cut into wedges and add the remaining ingredients
(Chef D was absent for this lesson but Chef A was there to teach and demonstrate. She suggests to be creative with the fruits so we all chose coring the appple and slicing them in rounds like doughnuts)

3. Cover with a cartouche and cook over low heat.

4. Toss occasionally and cook until tender.
(This does not take longer than 10 minutes as apples are cooked quickly. Don't leave the cooking process too long as the apples can actually explode, literally).

5. Place the cooked apples on a plate lined with kitchen paper towels to dry them out a bit while preparing the anglaise sauce.


To make the Sauce Anglaise (adapted from the same book, but quantities and serves revised to only 5 from the CD included)

3 egg yolks

32g caster sugar

250ml milk

1 vanilla pod (Note: Alternative is 5ml vanilla essence)


1. Separate the eggs and cream the yolks with the sugar.

When we did this in Kitchen 10, we creamed the eggs and sugar in a large bowl using a whisk.

2. Heat the milk with the split vanilla pod and add gradually to the egg yolk mixture.
Using a spatula, the warm milk is slowly incorporated into the egg mixture which is now placed over a saucepan of simmering water. This takes about 10-15 minutes. It is important to focus on this as it can easily split as I've mentioned above. This process continued until the sauce has thickened, which eliminates Step 3 below.

3. Return to the heat and thicken until it coats the back of the spoon. Strain and cool.

Once thick, pour over a strainer into a bowl and place over a larger bowl filled with ice and water. This stops the cooking process and eliminates the possibility of splitting.


Isn't she just gorgeous?! Apple compote with L'Anglaise Sauce garnished with sultanas! What a mouthful!


Tuesday, March 08, 2011

Poultry preparation today @ Kitchen 10...

... and look what I came home with!


Lesson 5 was all about poultry preparation including trussing, cutting for saute, frenching wings and frenching drumsticks. Frenching actually just means cutting off the bone joints.


The trussing method is for when the chicken is to be used for roasting. Trussing is preparing the whole chicken by tying the legs and clipping the wings under the chicken for proper roasting.

Lesson 5 also included : Thai chicken curry, rice pilaf and raita. All great Indian dishes and tastes just as great. The recipes are right there on the board. I loved the cucumber raita! In Greek parlance, this is Tzatziki. Easily bought from the supermarket, but why buy when you can create?!

No food photos this time as I was too distracted by my blue finger. Too exciting!

LinkWithin

Related Posts Plugin for WordPress, Blogger...