Welcome to adobo-down-under!

Musings. Family. Food. Stories. Cooking. Recipes. Eating. A recipe journal. From simple Filipino dishes to challenging recipes and exciting gastronomical failures. This is for my girls to look back on for comfort, memories, laughs, love and lots of food!
Showing posts with label light lunch. Show all posts

Saturday, August 08, 2015

Pork and beans


Growing up a few decades ago compared to today, there were so few choices when it came to food.  The cereal variety was maybe about less than ten.  There were no gluten free pasta or bread, no dairy free butter, no sugar free muffins.   Coffee was coffee, no soy, light, chai, etc.  A steak was usually T-bone, no varieties such as Wagyu, Angus, or labels such as corn fed, grass fed, aged, dry aged, etc.  Food was food.  There were no unnecessary labels.  Whether it was fresh - from the ground, from a tree/plant or packed - cans, boxes, plastic packaging.   Today, it's an entirely different story.  Whatever happened to simple food?  

In his 2009 book Food Matters, Mark Bittman mentioned modern agriculture, global warming, sustainability and the change towards conscious eating. These days, we don't look at calories anymore. Consumers are conscious about where their food comes from, the carbon footprint, whether its organic, grown locally or imported from half way around the globe.  This kind of mentality creates a good set of consumers. Smart consumers.  But then we also create a lot of waste.  In Australia alone, consumers waste an estimate of 4 million tons of food each year!  Because what happens is we tend to shop more than what we can actually consume.  (How not to waste food shall be for another post!)


I'm not a fan of food fads but I do believe in simple good food. Seasonal cooking is always how we plan our menu at home.   Simple food prepared at home. With love.  For family and friends.


Now growing up, we were fed with lots of food I wouldn't normally buy these days. Our parents back then fed us with what they knew best.   Powdered orange juice (Tang), canned vienna sausages... including a favorite breakfast fare a million years ago.  Canned pork and beans.  A mixture of beans covered with sweet tomato sauce and about 1 to 2 pieces of pork.  We used to eat it on toasted white bread and loved it for breakfast and even after school snack. And sometimes ate it with rice too.  It's a Filipino thing (rice with everything).

Now this is my take on the canned pork and beans I grew up eating.   A simple dish made of 2 basic ingredients:  pork and beans! 


Ingredients

200 grams pork belly, cubed

300 grams French beans, cut into 2 inch pieces

2-3 cloves garlic, minced

salt and pepper to taste

vegetable oil 

chilli flakes (optional)


Method

Heat a shallow pan and add cooking oil.

Fry the pork pieces until crispy.  Set aside.

Using the same pan, add the garlic and cook until soft and fragrant. Do not overcook or burn.

Add the beans, and stir to cook the beans until bright green, about 2 minutes.

Add the cooked pork and stir to mix through.

Add the chilli flakes (if using) and stir.  Turn off heat.

Serve with steamed rice.


Thursday, April 03, 2014

Salmon rissoles


As Lent is upon us, we like to eat more fish or seafood dishes this season.   As a Filipino parent, we try to instill in our kids traditions that we grew up with.  And as born Filipino Catholics, there's a lot of these traditions that come during Lent - from Ash Wednesday to Maundy Thursday to witness washing of the feet, to Good Friday to do the Stations of the Cross to Easter Sunday.   While we can't always do all these traditions because of timing and schedule, we do keep to our lenten sacrifice.


From Ash Wednesday, it's customary that we avoid eating meats on Fridays for the whole season of Lent.  In the past years, I have personally sacrificed eating meat for 40 days and it was a welcome change.   


Every year, each of the girls have their own fave food or habit which they sacrifice for the whole Lenten period.  Usually they give up chips, lollies, chocolates, soda, etc.  It's a good exercise of discipline as sometimes I forget and pack some in their lunch box, and then I get told off.  "Please don't add chips in my lunch box as I'm sacrificing that for lent, mum."  It's good for discipline and for the health too!


Now this is a fantastic option to our weekday or weekend menu.  Salmon rissoles.  They're easy and so inexpensive to make.  The recipe is adapted from Coles recipes.


Ingredients:


4 medium sized potatoes
 
30g unsalted butter
395g tin red salmon, drained and flaked

3-4 spring onions, chopped

1 cup breadcrumbs

zest and juice of 1 lemon

1 egg

1 cup corn flour


vegetable oil or light olive oil for frying


Method

Boil the potatoes until tender, 20-25 minutes.

Drain.  In a large bowl, mash the potatoes with 30g unsalted butter.

Add the flaked tinned salmon, bread crumbs, spring onions, egg, zest and juice of the lemon.

Mix and shape into patties.

Roll in corn flour and shake off excess.

Continue wth the rest of the patties.

Heat a pan on medium heat with enough oil for frying.

Pan fry the rissoles in batches, for 5-6 minutes or until golden.

Drain on paper towels.

Serve with garlic aoili (simply add crushed garlic into a cup of store bought mayonnaise) and a lemon wedge.


Tips and tricks:

*Variations on this rissoles, would be using tinned tuna or flaked smoked salmon;

* When shaping the patties/rissoles, make sure they are uniform in size to make cooking easy

* You can add other greens into the rissoles.  Chopped basil or chives will work great too.


Monday, October 21, 2013

Chicken rollatini with ricotta and spinach


It's 65 days more till Christmas!  A little bit more than two months to the silly season!  Shopping malls are already filled with trimmings and marketing ploy to make us stay at the malls longer and shop till we drop. 


Well that ain't working with me.  You see, I hate shopping.  I hate shopping malls. I hate shopping malls during the Christmas rush especially. 


Usually, if there's really a need to go in there, I'd dash in and out in less than hour.  


Not that I don't shop for clothes and shoes.  I do.  It's just that when I'm out shopping, I pretty much know what I want and get it.  Straight up.  


But with food.  Food shopping?  I'm more patient and take time.  Savouring the smells of seasonal fruits and fresh veggies, browsing at the seafood on offer and cuts of meat for the day.  I usually shop at the markets and my favourite Asian butcher and fish monger locally.  And that's my happy place.   


So usually Christmas gifts to family and friends are always food related - cookbooks, kitchen and dining gadgets and home made goods.  


Now talking about Christmas always brings me dinner table thoughts.  You know, menu for the Christmas eve dinner, Christmas breakfast, Christmas lunch, Christmas dinner and every single meal all the way to New Year's day.  It's always exciting to try new dishes in preparation for that special day.  Often times, anticipating the traditional dish becomes the highlight of the meal.


Now this chicken dish can be made any day of the week, a weekend lunch or dinner or try it this holiday season.  The colours do match the holidays too.  This recipe is adapted from  Skinny Taste with the ingredients slightly changed.


Chicken rollatini coated in bread crumbs


Baking in the oven for 25 minutes


Ingredients

500g chicken breast fillets, thinly sliced

125g ricotta cheese

250g baby spinach, washed and roughly chopped


2 cups breadcrumbs

2-3 whole eggs, slightly beaten

125g cream cheese, sliced thinly

125 grated Tasty cheese

700g jar of passata sauce

salt and pepper to taste


Method

Preheat over to 180*C.

Prepare an oven proof rectangular dish.  Spray with canola oil and set aside.

Prepare 3 separate bowl, one with breadcrumbs and one with the beaten eggs.

In a medium sized bowl, combine ricotta cheese and spinach and mix with a fork.

Set aside.

On a large chopping board, work the chicken pieces one by one.  Spread the chicken fillet flat, spread some ricotta-spinach mixture and loosely roll with the seam side down.  Repeat with the remaining chicken pieces.

Coat the chicken rollatini in the beaten egg, then roll into the bread crumbs.  Place in the prepared baking dish.  Repeat with the rest of the chicken pieces.

Lightly spray with olive or canola oil.

Bake in the preheated oven for 25 minutes.

Remove from the oven then pour the passata sauce over the chicken pieces.

Place cream cheese slices on top of the chicken, then the grated cheese.

Bake in the oven for a further 5 minutes or until the cheese has melted.

Serve in individual portions with some salad or roasted vegetables.


After 25 minutes....


Topped with cream cheese and grated Tasty cheese....


Cheese has melted.... seasoned with some more ground pepper
 

And served with some extra explosives on the side! Ha!


Now this has delicious written all over it.  We've made this many times using bocconcini as topping and some mozarella.

Don't you think it looks like Christmas?

Now... time to get some list going.   Thank goodness for online shopping!  Hahaha!


Thursday, March 21, 2013

Gambas al Ajillo


Ok.  So today I decided to brag about this dish.  Er. I mean blog about this recipe.  This was only after I realised this dish is not yet in my blog archives.  How can that be?  It's one of my all-time favourite dishes way back when - as an appetizer usually when out drinking with mates.  Back in the day.  And yes, at home too as a main dish.  Its a simple dish without the need for a recipe, really.  Just the basics of olive oil, garlic, chillies, parsley and good ol' salt and pepper.  Its actually one of those dishes which you can re-create on your own just by tasting the dish.  You know those times when you eat something at a restaurant that looks easy enough and you try to replicate it at home.  Well, this is like one of those.  Actually just look at the picture and you will already know what to do.


Gambas al Ajillo is a Spanish dish which originates from the South of Spain and it is really a tapas dish - an entree or appetizer.  A long time ago, when I took a short Spanish cooking class at the Sydney Seafood School, this was one of the tapas dishes we prepared.  Intentionally, I enrolled to learn the basics of paella.  And it was a bonus to learn two other tapas dishes  - this one included.  An easy Spanish tapas dish which is already a hit every single time.   When I organised the Taste of Harmony lunch at work and asked everyone to bring a dish from a country they want to visit, I initially thought of making Tres Leches Cake because one of my dream is to visit South America and trek the Machu Picchu. But I also would love visit Spain and making this was easy enough on a weekday morning. 


To make Gambas al Ajillo

500g prawns - washed, peeled and deveined

3 cloves garlic, crushed and chopped finely

2 birds eye chillies, chopped finely

1/2 cup flat leaf parsley, roughly chopped

3 tablespoons light olive oil

salt and pepper to taste


Method:

Heat olive oil in a skillet or pan.

Add the garlic and cook until soft but not brown.  
(Do not burn as your dish will taste bitter)

Add the prawns and stir until cooked through.

Add the chopped chillies and stir.

Season with salt and pepper.

Top with the chopped parsley.

Serve with toasted crusty bread.


Taste of Harmony lunch feast at the Office


I'm grateful that I work in small organisation and coercing everyone to bring a dish with a theme was too easy.  Everyone had a good lunch celebrating with lots of food and stories to share.

 * Taste of Harmony is an initiative by the Scanlon Foundation whose vision is to enhance social cohesion in Australia.  TOH is an annual event which encourages workplace colleagues to share food and stories from different cultural backgrounds.


Sunday, February 10, 2013

Shakshouka


I have a confession to make.  I am a noob at other culture's cuisines.  Sans the traditional Italian, Spanish, Japanese, Chinese, Vietnamese, Korean, Thai, Indian, Mexican, Malaysian and Greek dishes, when it comes to other cuisines, I am as clueless as a child.  You know the one who refuses to eat her vegetables and only eats naked pasta when allowed.  Growing up with a limited repertoire of available cuisines, it was either Filipino traditional dishes, American (steak and mash or hamburgers is the usual) or some pasta dish and the occasional tacos.  Eating out almost always took the Chinese or Japanese route or a fave pizza parlour complete with folk singers with guitar singing Puff the Magic Dragon and Horse With No Name.  


Malaysian, Vietnamese and Thai only came in early adulthood when restaurants started opening in Manila and showcasing neighbouring Asian cuisines.  So that was about a decade or so ago.  A far cry from the state of the restaurant industry in the Philippines these days.  Fusion of Mexican-Japanese  now exist, traditional Sri Lankan and a host of other gourmet fusions. There are cakes,  patisseries and chocolate shops that are at par with overseas counterparts. Filipino restaurateurs back home are showcasing Filipino food in a way that Heston  Blumenthal would plate a salmon dish at the Fat Duck.   Why there's even a franchise of Masterchef on local  Philippine television, and a live MC competition going on as I write this post.


Now being a noob in this day and age of technology is not acceptable.  Cooking shows attract a good following and reality cooking shows become the new Big Brother. Food documentaries, magazines, events, blogs!  Food has become as exciting as when TV broadcast its very first show.  Now back to me as the noob in this instance and learning how to cook (other dishes besides and a few other Filipino dishes).  This was a dish that I first saw from a TV show - yeah I know pathetic right.  And from there on, made it, made it, made it.  Hubby loves this.  I love it.  (The kids are not fans yet).  We make a cheats version with chorizo and tinned baked beans.  I love how versatile this can be and how its such an easy casual dish that can be served any time of the day.  


Just a week ago, I saw a good number of this dish in my IG feed and so a timely revisit to Shakshouka.   And so here is a recipe inspired by that TV show and a fave weekday meal at home.

 
To make this Shakshouka dish:
Print the recipe here

1 onion, sliced

1 red capsicum, chopped

1 green capsicum, chopped

4 Roma tomatoes, quartered

1/2 teaspoon sweet paprika (I used a Spanish brand)

2 eggs

olive oil

salt and pepper to taste


Method:

Using a cast iron pan (or any 20 cm pan), heat about a tablespoon of olive oil.

Add the onions and capsicum to the pan and cook till soft.

Add the tomatoes, stir and cook for two minutes.


Season with salt and pepper and half of the paprika and stir to coat the vegetables with the seasoning.

Turn the heat to low/simmer.

Using a wooden spoon, push aside some of the vegetables to make space for th eggs.
 
Crack the eggs into this space and let it poach until the whites are cooked through but the yolks are still runny.

Remove from heat and serve on the pan, with some toasted flat bread or any bread of choice.


Thursday, January 10, 2013

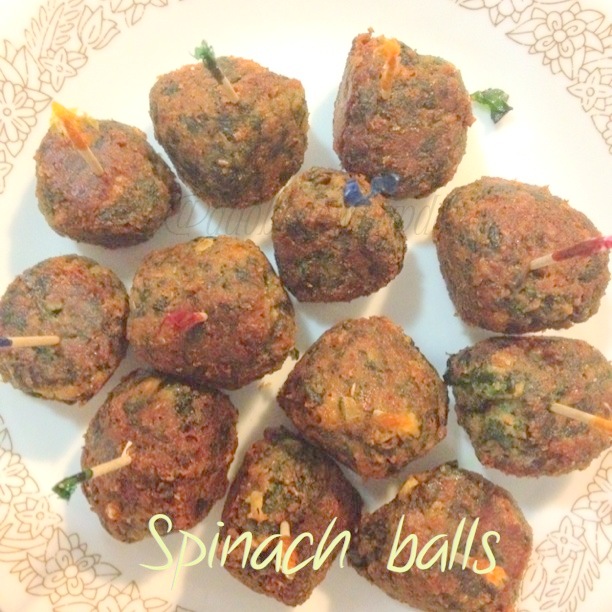
Spinach balls


After all the Christmas trimmings and tidying up happened there appears to be what now seems to be an empty space in the lounge room.  There was the tree and all the presents underneath.  A tub full of Christmas cards and trimmings.  A box of wrappers and sticky tapes.  Lots of toys scattered about and shoes and lollies if you may.  What used to be a corner full of excitement and chaos and cheer and colour is now empty.  Ah the holidays.  It brings so much excitement that its always bittersweet to part with the spirit and get on back to routine.  When's the next holiday again?


So.  Its the new year and tidying up the trimmings also meant tidying up some electronic backlog.  Photos untouched and recipes left unwritten.  And this post is one of those! I've been meaning to share after meeting the maestro of Italian cooking last October - the other half of the two greedy Italians Antonio Carluccio.

The Maestro is how he is in person as he is on television.  Jolly, unpredictable and full of laughs. He shares a joke or two through out the Sydney World Chef Showcase session I attended and was just as funny as he on stage and face to face, when I had my book signed.  This recipe which he shared and prepared on stage was something he created for a book 25 years ago, but has since used it for many other dishes, including as a vegetarian pasta dish or even layered in a vegetarian lasagna.


To make these spinach balls, I've halved the recipe to make 12 spinach balls. 
You can make 24 balls simply by doubling the ingredient quantities.

(Print the recipe)

250g spinach, washed

1 egg, beaten

pinch of freshly grated nutmeg

1 clove garlic, finely diced

50g breadcrumbs

25g grated parmesan

salt and pepper to taste

olive oil for shallow frying


Blanch the spinach in a pan of salted boiling water for 2 minutes.  Drain using a colander.

Using your hands, squeeze out the water from blanched spinach.  Then chop the spinach finely.

Place the chopped spinach in a bowl and stir in the rest of the ingredients: salt, pepper, eggs, breadcrumbs, parmesan, garlic.  

Mix well until you get a binding consistency - the ingredients are binding together. If the mixture is too wet, add a tablespoon of breadcrumbs.

Roll the mixture into little balls.

Prepare and heat a shallow pan and cover the base with enough olive oil for frying.

Shallow fry the spinach balls in the hot olive oil until golden, 3-4 minutes per side.

Drain on kitchen paper and serve warm (or cold).


These little spinach balls are so good and healthy too! Eaten by themselves or dipped into your favourite sauce (mayo, catsup, sweet chilli sauce, etc) I reckon they're great as appetizers especially during this summer for those backyard parties!  Also a great dish to bring to any party.  Hot or cold, they are divine!  After all, they were created by none other than one of the greatest cooks in this century.

So when's the next holiday again?  How about Australia Day!  These would be great in that picnic basket, don't you think?


Wednesday, September 26, 2012

Pearl barley risotto with wild mushrooms


I started at a new job recently.  Well last week actually.  Closer to home, same hours.  I'm back in my happy place.  Literally.  Yep. I'm swapping some gorgeous Sydney harbour views for the sticks.  If only those views can be translated into better work opportunity.  Sigh.  Anyways, this new job is permanent so more security and well... holiday pay, that's it!  This is my high.


And this is another high!  Discovering familiar recipes using new ingredients!  And this was from the first and latest Food First magazine (Fitness First mag), lying about in the office kitchen.  But I've adjusted the amounts in some of the ingredients.  The butter for instance, was 80g in the original recipe which I used and found it too buttery and oily.  I've also adjusted the olive oil here so you don't get a too oily and slippery risotto.


Risotto is not new to us.  We have a few faves at home (prawn, mushrooms and scallops versions) but pearl barley is a new addition to our pantry.  After some porridge episode, I knew pearl barley can't be just for porridge!  


To make this super healthy version of risotto, you'll need:
(Print the recipe)

75ml extra virgin olive oil

4 shallots (Spanish onions), finely chopped

200g pearl barley

150ml dry white wine

1 litre white chicken stock, simmered and warm in a separate pot 
(I used home made chicken stock but you can definitely use store-bought variety.  Just be careful with adding salt in the dish as I find commercial stocks too salty)

sea salt and pepper to season

450g mixed mushrooms, cleaned and cut into bite sized pieces
(I used 150g each of oyster musrhooms, Swiss brown and shimejis)

3 cloves garlic, finely chopped

half a bunch (or a hand-full) of flat leaf parsley, finely chopped

25g grated Parmesan, plus extra to serve

30g butter, chopped


In a large shallow skillet or deep heave based sauce pan, heat half of the olive oil, then add the shallots. Cook, stirring until the onions are soft.

Add the pearl barley and cook stirring until the barley is coated with oil.

Add the wine and bring to a boil.

Reduce heat to a simmer and let the wine reduce.

Season with salt and pepper and stir through.  

Add about a third of the chicken stock let the barley simmer, letting the stock reduce.  Add more stock and stirring occasionally, until the barley is tender.  (The barley should be soft but still retains that bite).

In a medium pan, heat the remaining olive oil and cook the mushrooms until soft.

Stir in the garlic and parsley and cook for about a minute, stirring while cooking.

Add the mushroom mixture to the pearl barley.  Taste and add salt and pepper to adjust seasoning.

Stir in the parmesan and butter.

Serve in pasta bowls or plates with extra shaved Parmesan.


Let me just say this was a "wow" at every bite.  Every nutty barley bite.  A healthy alternative to the usual risotto.  And a cheaper one at that too.  How's about a pack of 500g pearl barley for only $2.99?


Wednesday, September 19, 2012

Chopsuey - stir fried veggies


I love the interview article with Ruth Reichl in the Spectrum from the weekend SMH as part of the upcoming Crave Sydney Festival.  Ms Reichl talks about how we need to get back into our kitchens and cook.  And in turn change the way kids eat these days.   And the message isn't about shoving vegetables into our kids diets or going into every diet-health-fad-bandwagon.  Its about eating together, sharing meals and connecting.  


Much to my frustration, I used to do just that.  Cook and prepare meals with vegetables, only to have teeny tiny bits pushed on every side of the plate.  So I've stopped.  Vegetables are now served as is, with meats and chicken, or in pasta,  in salads and they just get when they want.  The rule is, don't say you don't like it until you've tasted it.  And it works, for the most part.  But we're not rushing.  We share meals every day, and in the weekends.  Although sometimes it can get animated, more talking from the young ones than the grown ups, its a happy place to be.  Reichl says, "... the power of dinner, for me, is not so much that it has to be the greatest meal, but that you hear about what's going on in everyone's lives."  Enough said.


Now speaking of vegetables, let me introduce you to this simple classic Filipino dish.  The base is mainly vegetables, but there's variations like adding chicken strips or prawns.   Usually served as a side for meat or chicken dishes, or part of the main.  Quick. Simple. Easy.  You can make this for a weekday dinner or lunch, or make big portions for a party.


To make chopsuey:
(Print the recipe)

1 carrot, sliced into discs

1 red capsicum, sliced into squares or strips

1/4 cabbage, sliced

1 pack (about 100-150g) young corn

150g snow peas

150g button mushrooms

2 cloves garlic, finely chopped

1 onion, quartered

1 tablespoon vegetable oil

1 tablespoon light soy sauce

1 tablespoon oyster sauce

1 cup water

2 tablespoon corn starch

salt and pepper to taste

6 pieces cooked/boiled quail eggs, shells peeled


In a shallow pan or skillet, heat the oil and saute the garlic and onions.

Add all the vegetables and half the water. Bring to a boil.

Add the soy sauce and oyster sauce and let simmer for 3-5 minutes.

With the remaining 1/2 cup water, dissolved the corn starch.

Add to the vegetables, then let simmer until vegetables are cooked and sauce has thickened.  

Add the quail eggs and turn off heat.


For variation: Add about 250g of chicken strips or prawns.  Add this after sauteing the garlic and onions and let simmer until cooked before adding the vegetables.


There are other ways to make chopsuey, but this version is the easiest I've ever made.  Sometimes, we just have to rely on the taste rather than the process of how its traditionally prepared.  As long as its shared with family and friends,  over stories that will be heard and shared in years to come. 


Ruth Reichl will be one of the food industry experts at the Crave Sydney World Chef Showcase first weekend of October 2012.  If you're in Sydney, check out the program here.

Friday, September 14, 2012

Banana porridge with date and verjuice compote


I know it's already spring, but porridge is not really just for the cold weather, right?  It's way up there in the list with the title "comfort food".  Any version whether its the Chinese congee or the Filipino lugaw, a good porridge brings us back there - sitting on your grandmother or grandfather's (or you rmum's or dad's) lap listening to tall tales, folk lore and colourful adventures.  Comfort food hugs you tight and gives you warmth.


Well, this isn't a recipe passed on to me by family, but the first time I tasted it, it just felt good. It was at a blogger's brunch party at Kazbah in Balmain.  One of the 8 dishes served on the day, this one stuck with me.  It was served to share, in a massive bowl with some date compote on top.  It was simple and yet, that one spoonful was not enough.  And then another.  There was a nutty taste to the porridge and a certain bite at every mouthful.  And we can only guess it's barley.  So I've tested and made this up.    And this is it.


To make this, I had to adjust as I went, tasting and tasting every minute, just to get it right.

To make the banana porridge:

(Print the recipe here)

1/2 cup rolled oats

1/2 cup rice flakes

1/2 cup barley

3 over-ripe bananas, mashed

2 cups (480ml) water

2 cups (480ml) milk

1/4 cup raw sugar (or more to suit your taste)


In a medium sized pot, put together the oats, rice flakes and barley.  Add water and bring to a boil.

Add the milk and bring to a boil, then reduce heat to a low simmer.  Stir occasionally to make sure porridge is not sticking at the bottom of the pot.

Add the bananas and continue to simmer (about 20-30 minutes) or until barley is cooked.  (You will know when its cooked as they will be soft but still have that bite).

If the porridge becomes to thick, just add a quarter cup of milk at a time, stir then taste.   Add sugar to suit your taste.  But the natural sweetness of the ripe bananas should be fine.


The cast of characters


To make the date and verjuice compote:

1 cup dried pitted dates

2 cups verjuice

In a small pot, pour the verjuice and add the dates. Bring to a boil then slow simmer until the dates have softened and the sauce reduced.  Set aside to cool.

For a sweeter version of this compote, you can add 1 tablespoon raw sugar to the mixture while simmering.    

Or you can try Suzanne Husseini's version in her book Modern Flavours of Arabia which I found through Emma's My Darling Lemon Thyme where she used fresh orange and lemons. 


The date compote was made with verjuice so the natural sweetness of the dates came through.   This was unlike the one that topped what we ate at Kazbah (which was sweeter), so hubby was not sold to the compote on top.  But he gives two thumbs up to the porridge.   Beats any 90 second breakfast oats at any time.   Drizzled with some honey (or real maple syrup) and serve.  With love and lots of hugs.


Wednesday, September 12, 2012

Shallow-poached tilapia in coconut milk with chillies


Fish  and seafood dishes are common  in the Philippines. Surrounded by large bodies of water at every corner, fish/seafood is a staple alongside rice. Several big canning companies abound in the western part of the country exporting tuna and sardines across the globe.  And the variety of edible fishes are a plenty that a weekday meal is not without fish.  Buying them straight from the market is the only way to get them fresh.   And they are fresh. No frozen from catch, but real fresh. And being Filipino, we love our seafood.  We love our fish.  Fresh.


Sadly, we can't get fresh tilapia in Sydney.  As these fresh water fishes are considered noxious (like pests, they multiply rather quickly) by the NSW Department of Primary Industries, cultivation of tilapia is banned in NSW as they pose a threat to other native fish species.  Although there are breeding populations in other states.


But this does not stop a Pinoy when he/she craves food from home.  So we get frozen cleaned tilapia form our local fishmonger, or the Asian/Filipino shops.  We just leave them at room temperature to thaw before cooking.


To make this  dish, you'll need:

400ml can of coconut milk

1 Spanish onion, sliced

1 knob of ginger, sliced into thin strips

1 or 2 pieces of fresh or thawed tilapia

2 long green chillies

2 birds eye chillies

1 bunch bok choy

1/2 cup chopped coriander

vegetable oil


In a shallow pot or skillet, heat about a tablespoon of vegetable oil and saute the onions and ginger.

Add the coconut milk and bring to a boil.

Place the fish in the coconut milk, bring to a boil then bring to a low simmer and cook for 20 minutes.

Add the chillies and bok choy and continue to cook until the bok choy is soft.  Turn off heat.

To serve, using a slotted spoon or spatula, gently lift the fish onto a platter. With a spoon, scoop the sauce and pour on the fish.  Add the vegetables and chillies to the platter.  Garnish with chopped coriander.

For variation, you can also use cleaned whole snapper, bream or any white fleshed fish.


This is a lovely and simple dish that you can make any day of the week.  Its quick and easy and packed full of healthy (and spicy) ingredients.  You can omit the chillies all together, but add some more ginger for that extra punch.


Friday, August 03, 2012

Carrot galette

"Carrots are divine, you get a dozen a dime.  It's maaaa-gic!" - Bugs Bunny


There's some wise words there.  From one of the most influential characters in the animated world.  I reckon its because of Bugs Bunny that carrots are usually the first vegetable the children learn to love.  But seriously, what's not to love about the humble carrot.  They are the most versatile vegetable in the world!  In the universe, even.  You can roast them, add them to braised and stews and casseroles, boil them, mash them, fry them, grill them.  And they're not just confined to savoury dishes, they're also great in cakes!  So what's not to love!  They come in lots of lovely shapes/size and colours too!  Have you even seen a purple carrot? They're the next super food says The Age.

Daucus carota sativus nicknamed carrots as everyone already knows, has beta-carotene (Vitamin A) which helps maintain good eye sight.  They're also rich  in fiber, antioxidants and minerals.  There's an urban  legend  which originated among British gunners from the Royal British Airfoce during World War II that says "eating carrots can allow one to see in the dark."   Fact or fiction?  Who knows?! But let's not go there. 


Here's a carrot recipe adapted from a local supermarket's magazine -  Coles.  It's super easy to make using store-bought puff pastry I used the local brand Careme which is absolutely positively the best!).  You can also use any kind of cheese you fancy and any of your favourite herbs.  I've halved the ricotta called for in the original recipe and used bocconcini  and used dried oregano instead of fresh ones.  Served alongside your main or as a starter.  They're gorgeous and packed full of healthy stuff.  The humble and versatile carrot is the feature for Week 8 of the Power Foods blog hop organised by Mireya of My Healthy Eating Habits.


To make this Carrot Galette,  you'll need

a bunch of Dutch carrots

olive oil or canola spray

375g block of frozen puff pastry, thawed

150g fresh ricotta cheese

150g bocconcini

finely grated lemon zest of 2 lemons

1 teaspoon of dried oregano

salt and pepper to season


Preheat oven to 180*C.  Line a baking tray with non stick baking paper.  

Wash and scrub carrots and trim the top leaves.  Cut into half lengthwise.  Arrange on a single layer on a tray and spray lightly with oil.  Roast for 10-15 minutes until just tender. Set aside once done.

On your kitchen bench, roll out the pastry.  Crimp the edges and using a butter knife, light score a line on the edges to create a border.  

Using a fork, prick the area inside to create air pockets.


Combine the cheese, zest (and half the fresh oregano if using fresh) in a bowl and season with salt and pepper.

Spread the cheese mixture on the pastry.  Arrange the carrots on the cheese mixture, then sprinkle with the dried or fresh herbs.

Bake in the oven and cook for 20-25 minutes or until pastry is crisp and golden brown.


This post is part of a Power Foods blog group.  Check out Mireya of My Health Eating Habits and the other Power Food posts from Alyce from More Time at the Table, Ansh from Spice Roots,  Casey from Bookcase Foodie, Jeanette from Jeanette's Healthy Living, Jill from Saucy Cooks, Martha from Simple Nourished Living and Sarah from Everything in the Kitchen Sink.


If you are a blogger and would like to take part in this blogging group about Power Foods: 150 Recipes with the 38 Healthiest Ingredients from the editors of at Martha Stewart's Living Magazine, please get in touch with Mireya at mireya@myhealthyeatinghabits.com for details. 


LinkWithin

Related Posts Plugin for WordPress, Blogger...