Welcome to adobo-down-under!

Musings. Family. Food. Stories. Cooking. Recipes. Eating. A recipe journal. From simple Filipino dishes to challenging recipes and exciting gastronomical failures. This is for my girls to look back on for comfort, memories, laughs, love and lots of food!
Showing posts with label cold. Show all posts

Tuesday, October 21, 2014

Coconut tapioca with mangoes


So.  I made this for an office birthday lunch Thai cuisine theme.  And everyone fell in love.

I have made this at one of our street BBQ parties and it was a hit.

Hubby loves this and eats portions of it every day when its in the fridge, slowly partaking of the sweet dessert controlling himself.  Otherwise he could eat it in one sitting.

I posted this on FB and was asked the recipe.

Sometimes, what seems easy can be complicated when specific details are amissed.  For example. A friend of mine in Manila asked me for the recipe and so I told her what I did - boil and cook the tapioca, warm the coconut milk and add sugar, mix the tapioca with the coconut milk, pour into pyrex or tray, chill then top with mangoes.

Seems easy, right?

Of course, I didn't realise that she buys the tapioca from the markets cooked already.   
Was she suppoesd to boil and cook them again?  
Of course, this will make things a little less starchy as cooked tapioca bought from the markets has been washed.

Nor did it occur to me that of course absolutely, fresh grated coconut is available and that she will squeeze the milk out of them to come up with, say... 400ml.   
How many cups per squeeze can you get from one whole grated coconut?  Does she use the first extraction or the second extraction?


If she had followed what I said, she would have missed a few points.  Lost in translation. Or in this case, lost in ingredient translation.


And in other news - we are on our way to a new parenting challenge in the guise of the HSC.  As migrant parents, we obviously did not go through the High School Certificate (HSC) in Australia and now that our oldest daughter is going to take it next year, there's a lot of learning and understanding that is going on in my head and hubby's.  With all the media attention during HSC and the unnecessary stress that is highlighted in the news, kids can get easily swayed into the axiety parade.  HSC is somewhat similar to the NCEE that hubby and me took in high school going to college.  This is now known as NSAT (National Secondary Achievement Test) which is a goverment initiated as well.  The difference is that the NSAT is a test based on all general subjects taken during high school which becomes a factor when applying for a place in university.  Whereas the HSC is a test for subjects which the students have chosen from a list by the Board of Studies including general subjects, and which they are preparing for from Year 11 to Year 12.  The HSC exams result per se, is not the be all and end all of the assessment.  The results is a 50/50 mark of 1) school based assessments tasks, and 2) examination marks.  It seems pretty straightforward, until they introduced another acronym called the ATAR - Australian Tertiary Admision Rank which is a basis for acceptance into some universities.  Or so I think....  as you may already noticed, we are still learning.  And HSC is part of it... learning to be Australian.


If you're a migrant like us, or a Filipino family with young kids, I'll keep you updated on what have we learned from the HSC as a family.   And if you're a parent who went through HSC, please send me some encouraging thoughts. 


For now, here's a fool proof recipe for this sweet and easy dessert.


Ingredients

1 cup mini tapioca pearls

10 cups water

 2 cans 400ml coconut milk

1 1/2 cups raw sugar

1 mango, sliced into thin strips


Method

Boil 10 cups of water.  When rapidly boiling, add the tapioca pearls and continue to boil.

Once the tapioca pearls are half way through cooking - the outside part of the pearls are transparent but the middle part is still white, turn the heat to low and simmer the pearls until cooked through, stirring occasionally to prevent from sticking to the bottom.  This can take from 30-45 minutes on simmer.

Drain the cooked tapioca pearls through a sieve under cold running water.  Set aside.

In a medium sized pot, boil the coconut milk then add the sugar, stirring to make sure the sugar has dissolved.  Simmer until the sauce thickens slightly.

Add the tapioca pearls and stir distribute the pearls throughout.  

If the sauce looks too much, scoop some of the sauce into a bowl and set aside.  The pudding should have enough sauce to tapioca pearl.  Reserve the extra coconut milk mixture.

Transfer to a pyrex or dish and chill in the refrigerator overnight, or 8 hours.

Top the pudding with the mango strips and served.


Tips and tricks:

*If you are using already cooked tapioca, simply drain the store bought pearls before adding to the thickened coconut milk.

* If using freshly extracted coconut milk, use the first extraction and about half a cup of water added per whole coconut.

* If after chilling, you find that the pudding is too thick, add a half cup of the reserved coconut milk mixture at a time until you get the desired consistency and thickness.

* These can be served in individual cups or serving glasses like my previous post with papaya, topped with any fruit you prefer.

* Fruit topping should be tropical like mangoes, papaya, purple yam or pineapple to suit the dish.  As coconut works well with tropical fruits.

* I have prepared this before in individual cups for my mom's 75th birthday party and topped them with purple yam / ube jam.


Monday, October 06, 2014

The "Baked" gluten free brownies with raspberries


I'm a sucker for brownies.  And brownie recipes.  There can never be just ONE brownie recipe and I thought that I will never reach my limit for trying new ones.   Until I found this.  345g of pure dark chocolate goodness with some espresso mixed in and voila!  I've struck gold through my social network!


I only found this "Baked" brownie recipe through Selina who I virtually met on Instagram and makes these brownies by the hundreds.  Well, hundreds of squares that is.  The rich, dense, dark look of the brownies on the photos got to me.  And I could not stop thinking about these brownies until I actually bought some espresso powder and made them.  Now I don't just think of them, I make them every so often just to eat at home.  I use gluten-free flour which makes it even more dense and rich, and also add some raspberries for that sour factor.  It's sensational! 


Ingredients

1 and 1/4 cups gluten free flour*

1 teaspoon salt

2 tablespoons dark unsweetened cocoa powder*

345g dark chocolate 70% preferred, coursely chopped

250g unsalted butter, chopped into cubes

1 teaspoon instant espresso powder

1 and 1/2 cups caster sugar

1/2 cup packed light brown sugar

5 eggs, room temperature

2 teaspoons vanilla extract

2 cups frozen raspberries (optional)


Method

Preheat oven to 175*C

Grease and line the base and sides of a 9x13 pan with baking paper.

In a medium sized bowl, whisk together flour, salt and cocoa powder. 

Melt the butter, chocolate and espresso powder in a large bowl over a pot of simmering water.  Stir until the chocolate and butter has melted and the mixture is smooth.

Turn off heat but keep the bowl over the pot.  And add the sugars to the chocolate mixture and stir with a spatula or a whisk until completely combined.  Remove from heat.

Add 3 eggs to the chocolate mixture and stir with a spatula until just combined. Add the remaining 2 eggs and continue to stir until eggs are incorporated into the batter.

Add the vanilla and stir.  Do not over mix.

Add the flour mixture to the chocolate mixture in 2 to 3, and gently fold with a spatula.

Pour onto the prepare tins. Scatter and press the raspberries on top of the batter (if using).

Bake in preheated oven for 30-40 minutes, or until a skewer inserted comes out with a few moist crumbs.*


Tips and tricks:

* If you prefer the original version, use equal amounts of plain flour.  I used the local (Woolworths) brand gluten free flour which is a combination of tapioca starch, maize, corn and rice flour.

* I usually don't test with a skewer but when the top looks matte-like (not shiny) I take them out of th oven.  


Monday, March 24, 2014

Aussie-Asian smoked salmon rice paper rolls


We love fish and seafood,  and salmon is one of our family's favourites.  Raw or smoked, it's always a welcome treat in the lunch box, in salads and in our mains.  And I was just too happy to oblige to receive an invitation to the #huonsalmon blogger's competition sponsored by Huon Aquaculture
 
 
With salmon and my cooking style, I prefer simple and fresh.  As much as possible, I want the star of the dish to shine.  So it was a little bit difficult to think of a dish to make that's not already out there.  And this came to mind - Australian salmon meets Asian spring rolls.  This may be one too many of similar dishes out there, but I don't mind.  This was a welcome change to our usual fare.  I also added some Australian macadamias for that extra texture and to make it even more Aussie.


Ingredients

8 pieces rice paper rolls

1 Lebanese cucumber, deseeded and julienned

1 carrot, julienned

60 grams salted macadamias, roughly chopped

60 grams rice vermicelli noodles


Method

In a bowl, soak the rice noodles in warm water for 10 minutes.  Once soft and noodles have turned white, drain.
 
In a large bowl, combine the rice noodles, julienned cucumber, carrots and the macadamias.  
 
  Prepare a wide bowl with some water, and a dry tea towel on the counter.

Soak one rice paper roll in the water for 10 seconds or more until soft. 

Place the rice paper and pat on the tea towel, then on a cutting board.

Place a strip (or more) of smoked salmon on the rice paper roll.

Spoon some of the rice noodle-macadamias-cucumber-carrts onto the smoked salmon.

Fold the front end of the rice paper roll and slightly tuck to hug the filling, fold the right and left sides then continue to roll.

Continue with the rest of the rice paper rolls and the filling until you've used up all ingredients.


These can be dipped in simple soy-sauce or sweet chilli sauce, or you can also make your own Nuoc Cham sauce which is the traditional dipping sauce for the inspiration for this dish - the Vietnamese spring rolls. This sauce is adapted from SBS Food with some slight changes.
 
To make the nuoc cham sauce:
 
1 garlic
 
3 pieces red chillies
 
juice of 1 lemon
 
60 ml fish sauce
 
60 ml warm water
 
3 teaspoon raw sugar
 
1/2 teaspoon Worcestire sauce 
 
 
Grind the garlic and chillies in your mortar until you get a paste consistency.

Combine the fish sauce, water, sugar  in a bowl stirring until the sugar is dissolved.  

Add the Worcestire sauce and stir.

Add the garlic-chilli paste, stir and serve with your spring rolls.


Disclaimer: The writer (adobo down under) was invited to take part in the #huonsalmon blogging challenge and Huon Aquaculture has provided the products mentioned in this recipe. 


Monday, February 17, 2014

Ice buko (coconut pops)


We're feeling the last of the summer breeze and the last couple of days have been grey and wet and humid.  Exacly the summer I grew up with back home. 

In the tropics.  Philippines.  Where I grew up.  


I spent most of my childhood in two places.  Subic Olongapo up north from Manila and Quezon which is south of Manila, where my grandparents were.  We'd be shuttled to the south during school holidays and back home after two months.  From the city to the country and back again. 


Two different worlds here, as Subic is monopolised by PX goods (PX meant Post Exchange or import restricted items from the US).  This was back in the day when the Subic was one of the Naval hubs in the Philippines.  While Quezon brings back memories of fresh, from-paddock-to-plate kind of food.  


There's a lot to look back to with childhood and what we ate back then and how food and consumers have evolved over the course of less than 20 years.  Compared to today's generation where there are so much variety and healthier options, one would think how we survived with canned food and loads of sugar in everything from cereals to juices -I'm thinking Tang orange juice here.  But not all my food memories were packed in tins and boxes and came from the freezer.  


Spending the holidays with my grandparents meant eating food from the local market - produce, meat and poultry grown by local farmers (back in the day when organic simply meant fresh, no regulations or certifying bodies), coffee beans grounded right there and coconut juice doesn't come in a tetra pack.  Trips to the market with my grandmother was always a treat where my prize for helping is a bag of freshly boiled peanuts, a glass of "palamig" (usually coconut juice with fresh coconut strips and some gulaman).


And afternoon play at the local playground meant waiting for the street vendors set up their kiosks in the afternoon offering the day's treats - and this ice buko (coconut) pops is just one of the many.  Ice buko (coconut) pops is a creamy, milk-based ice popsicle with some fresh coconut flesh and sometimes with sweetened adzuki beans (red mung beans).  They're the best treat after a day of hide-and-seek-running-climbing-trees-hop-scotch-outdoor-play-etc.


This recipe is inspired by one of my fave Filipino bloggers Jun Blog's -  ice buko with sweetened adzuki.


Thanks to Sophie from The Sticky and Sweet for hosting this month's theme at the Sweet Adventures Blog Hop.    Check out her Mars Bar Slice Cupcakes!    This was a fun theme, reminiscing about food from my childhood and the challenge to recreate them here.    I can't wait to see what the rest have created from their childhood memories. 


Ingredients:


2  330ml tetra packs organic coconut water*

1 397g can condensed milk

1 cup coconut cream

1 pack 494g shredded young coconut


Method:

Prepare ice pop moulds.
Or if you don't own one, prepare plastic cups and food-grade popsicles sticks.

Spoon a tablespoon each of the shredded coconut into the cups/moulds.

In a large bowl or a large measuring cup, mix thoroughly the coconut water, condensed milk and coconut cream.

Pour the coconut-cream mixture into the cups.

Place in the freezer until slightly set, about 30 minutes to an hour.

Place the popsicle sticks into the cups/moulds.

Freeze for another 4-6hours until solid.


Tips and tricks:

* You can use fresh young coconut juice bought from Asian shops or your local fruit and veg grocer.  And use 2 and half cups;

* I used C Coconut Water for convenience.  And after comparing the other brands available, this was the best I could get my hands on.  Most of the brands I found locally had sugar in them.  Check out the comparision review made by Coconut Water Australia to help you decide which brand to use. 

* If you can't get your hands on food-grade wooden popsicle sticks, you can also use wooden cutlery.  I actually used a wooden fork because I like the sticks are wider.

* To remove the popsicles from the plastic cups, place the popsicle under running water until loose.


Now, Sophie has got me reminiscing other things besides food from my childhood.  
 
I asked my Filipino friends and family on Facebook and what chlidhood food they miss growing up, and the response was just classic!  Here's what most of them are craving in no particular order:

4. Texas  and Tarzan bubble gum
5. Ice candy - homemade ice pops using fresh fruits pureed with juice
6.  Curly tops;

How about the days when blank cassette tapes the means to get the latest pop music via the radio.  Waiting for my fave song to play on the radio and pressing record.

Typewriters.  Carbon paper.  Aerosol hair sprays (gah!!!). Shoulder pads. Casey Kasem's Top 40. MTV. Duran Duran.  Sony Walkman. The Donny and Marie show. ....  Hahaha!  I should stop!  I'm giving away too much!


Monday, January 20, 2014

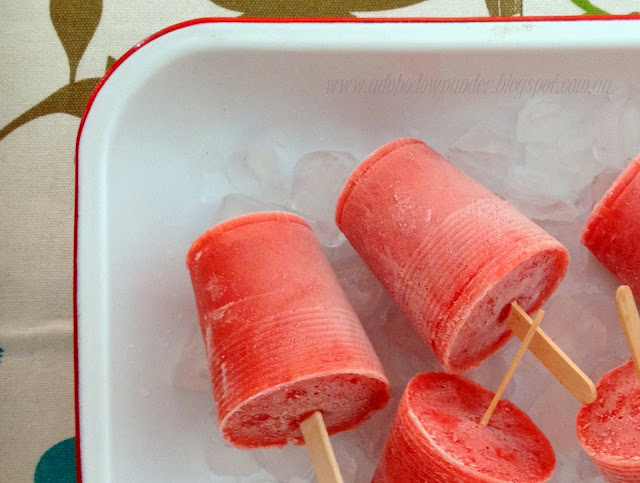
Peaches, strawberry and orange popsicles


It’s been scorching in Sydney and all across Australia as the heat surges to its 40s.  Adelaide was just declared the hottest city in the planet last week as temperatures soared to 46.5* and the tennis players at the Australian Open can’t escape from what is summer in Australia.   I’m not complaining though.  I love summer and everything that goes with it – Australian flies and all. 


It's summer and stone fruits are a plenty!  Sometimes I get overly excited at my local fruit and veg shop and just buy buckets load.  Sadly, with the heat most fruits soften quickly than normal at room temperature.  So some of these were put to great use - home made fruit pops or popsicles.  They're healthy, all natural and great to combat sweet cravings in the summer heat.


And a big thanks to Swah for hosting this month's Sweet Adventures Blog Hop!  Check out her elegant white tea, pomegranate and mint popsicles!  


To make these popsicles, we used plastic cups and wooden disposable forks.

4 peaches, pits removed
250g strawberries, hulled
juice of 4 valencia oranges
1-2 cups water

Using a blender, mix/process the fruits then add the orange juice slowly.  Add the water as much or as little as you want.   We used all 2 cups.

Pour into small plastic cups.  Then place in the freezer for 30 minutes.  When the popsicles are slightly firm, place wooden disposable popsicle sticks or wooden disposable forks.

Freezer overnight or for at least 6 hours.

Enjoy!


These popsicles definitely brought out the party mood in our home. 


LinkWithin

Related Posts Plugin for WordPress, Blogger...