Welcome to adobo-down-under!

Musings. Family. Food. Stories. Cooking. Recipes. Eating. A recipe journal. From simple Filipino dishes to challenging recipes and exciting gastronomical failures. This is for my girls to look back on for comfort, memories, laughs, love and lots of food!
Showing posts with label food props. Show all posts

Sunday, June 23, 2013

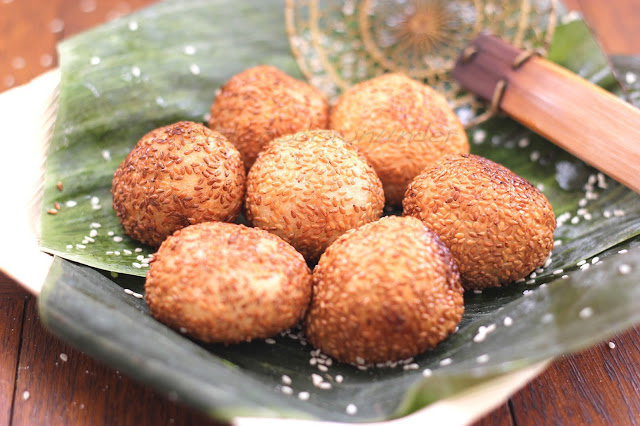
Deep fried buchi (sesame balls) with purple yam filling


There's a lot of fried foods out there.  And I mean the unconventional types - not the usual foods that one would deep fry at home.  Thanks to the influence of modern fast food cuisines, we've had a lot of deep fried trends pushing through the boundaries of health conscious folks.  There's deep fried hamburgers, deep fried butter, deep fried coke, deep fried ice cream to name a few.


Filipinos have a lot of fried foods.  Sweets included.  There's banana-cue or banana fritters, camote-cue or toffeed sweet potato.  I guess because the frying pan is one of the cheapest and most accessible cooking tool.  For a country like the Philippines, where the availability of ovens in homes is not common, the frying pan is an important cooking gadget - where one can stir, fry and even steam.   And its simple to use - just to pull out a pan, turn on the heat and fry away.  Street food around Manila consists of mostly fried food.  And this is one of those.  Called "buchi" in Tagalog, it is very similar to the Chinese yum cha sweet sesame seed balls.  In the Philippines, these are usually sold stuffed with sweet mung bean paste and sometimes without the filling, called the "karioka".


For this month's Sweet Adventures Blog Hop theme of From the Fying Pan hosted by The Capers of the Kitchen Crusader, I am sharing this Filipino recipe which we love at home.  A simple deep fried sweet dessert or snack treat, consisting of 3 main ingredients: glutinous rice flour, sesame seeds and store bought purple yam jam (ube jam). If you want to take the longer route, you can always make your own sweet red or mung bean paste for the filling.


Glutinous rice flour or sticky rice flour, sesame seeds and purple yam jam can be bought from your local Asian grocer or Filipino shops


Mix together 3 cups glutinous rice flour, 85 grams caster sugar and 250ml water to make a dough.  The dough should be a little bit moist but not too wet.


To make this deep fried buchi (sesame balls), you will need:

3 cups glutinous rice flour

85 grams caster sugar

250ml water

1 cup purple yam jam (or any preferred filling)

1 cup sesame seeds

250ml vegetable oil or more for frying


Using a large bowl, combine the flour, sugar and water and mix with your hands thoroughly to make a dough.

Place the sesame seeds in a separate small bowl. Set aside. 

Divide the dough into 20 round balls or more if you intend to make smaller treats.

Using a rolling pin, flatten one ball then scoop a teaspoon of your filling into the disc.

Put the edges together and shape it back into round balls with your hands.

Roll the stuffed balls into the sesame seeds.

Repeat for all the dough.  

Prepare a deep skillet and heat with about a cup of vegetable oil.

Once the oil is hot, slowly drop the buchi balls into the hot oil and cook until golden.  

Scoop out with a spider (in picture) or a slotted spoon.

Drain on paper towels.


Tips:

* The thinner you can flatten the dough, the more filling you can put in the buchi balls.

* When cooked, the dough should have a translucent colour and a little bit elastic.  If the cooked dough is still white, it's not yet fully cooked.

* The oil should not be too hot as it will burn the outside but leave the inside dough still uncooked.

* Be careful when deep frying. A deeper pot is advisable, if you don't have a deep fryer.

* You can opt not to fill the buchi balls with anything.  Simply make smaller rounds or flatten them before rolling in sesame seeds then deep fry.

* You can buy sweet red bean paste from Asian shops or you can also make your own homemade paste filling. The Beancounter has a recipe here.


These are the un-stuffed buchi balls which the kids love to eat - no stuffing for them.  Simple and sweet!


Tuesday, May 21, 2013

Peanut butter choc-chip cookie dough bites


"Think what a better world it would be if we all, the whole world, had cookies and milk at about 3 o'clock in the afternoon and then lay down on our blankets for a nap." - Barbara Jordan


That would be a great idea, right?  I mean imagine, the whole world - politicians, world leaders, miners, teachers... everyone, would actually sit down at 3 o'clock in the afternoon, have some cookies and milk and take a nap!  Imagine what it would be like!  It would be WOW!  There's be some giggling, and laughing and for a few minutes each day, there'd be harmony and peace.  Really!  


I've read about that quote by American politician and leader of the Civics Rights Movement Barbara Charline Jordan in the book by one of my favourite authors Robert Fulghum in his book All I Really Need to Know I Learned in Kindergarten. It's one of those staright-forward-simple books that inspires and makes you laugh and think a little.  I've quoted this book many times in previous posts, including this here.   And writing this post, I am once again drawn back to it.  If you haven't had the chance to read it, go get yourself a copy and read on!  I promise you, you'll sit back and smile at every page.


Now back to the order of things.  This month's theme at the Sweet Adventures Blog Hop is hosted by the lovely Nic from Dining with a Stud.  She's come up with a real challenge of sweets without heat. Check out her raw chocolate ganache tart - with a surprise ingredient!   The pictures are so drool-worthy!


Initially I thought there's no way I can make anything sweet without heat - but then I remembered when cookie doughs became a hit a few years back.  Maybe an onset from Ben & Jerry's ice cream flavour combinations.  Who knows.   But I first saw them from Joy the Baker , bookmarked and never really got the chance to try.  Recently though, I've been back on the Pinterest arena and once again hooked on pinning and browsing, with lots of hours wasted (?) bookmarking and planning stuff to do.  And so this post is inspired by a Pinterest-find from the Disney Family.com site - cookie dough bites.  


To make these peanut-butter-chocolate-chip-cookie-dough bites:

125g unsalted butter, softened

3/4 cup packed light brown sugar

1 tsp vanilla extract

1/4 teaspoon salt

1 cup flour

1 tablespoon peanut butter

1 cup bittersweet/dark chocolate chips


Method

In a large mixing bowl, cream together sugar and butter until pale.

Add the flour, vanilla, salt and peanut butter and continue to beat until everything is incorporated.

Add the chocolate chips and mix with a wooden spoon.

Using a teaspoon, shape into round balls.  

Chill for a few minutes.


These are quite addictive.  They're sweet with some bursts of saltiness.  Something like a chocolate-covered pretzel or a salted caramel ganache.  I must say the peanut butter made it a little bit better.  Packed and wrapped with a ribbon - they can be great Christmas presents too!  Eaten as is, chilled or covered with melted dark chocolate, these are great anytime of the day. With milk, and possibly a nap afterwards. 


Tuesday, May 14, 2013

Pink milk aka strawberry smoothies


Strawberries are still aplenty on the shelves here in Sydney. Sometimes, they're even on special at the local fruit and veg shop in our suburb. Some spill over harvest from summer means extra red yumminess to eat and in this case, drink at home!


This serves 4.

We used 2 250g punnets of strawberries

1 cup of ice cubes

2 tablespoons raw sugar

1 cup milk


Place everything in a blender and whiz away!


Tips:

  • These can be made using frozen strawberries, which in case you won't be needing the ice.  Just add milk to get the consistency you want. 
  • Vanilla ice cream or natural yoghurt can be a substitute for milk
  • To make this into a non-dairy drink, just add orange juice in leiu of milk.


When I make these, I make sure there's extra punnets at home.  That's only because my kids can't stop at one serve each.  They can be demanding when it comes to food!


Sunday, March 24, 2013

Strawberry-limoncello slushie (for adults only)


If you've been following me on IG aka Instagram, you'd know that we've been busy the last couple of weeks with the inlaws in town (yes, hashtag #inlawsarehere).  We've been doing the touristy thing - you know, Sydney icons - Opera House, Manly, Bondi, Blue Mountains, Harbour Bridge, The Rocks, etc. etc.  We even managed a trip down the South Coast and showcased Hyam's Beach to our guests.  We stayed at the hidden peninsula that is Callala Beach - a lovely little coastal town.  Our weekends were full on.  We shopped non stop (they love shopping!), ate non stop (food's always good anywhere), and just had great fun overall.


Although it can get really exhausting especially when in between these we still have to do our usual routine: school drop off and pick up, work, homework, cello/piano lessons... it's always rrefreshing to have guests around.  It breaks the routine of an otherwise monotonous existence.  Hubby and I truly enjoyed the adult conversation and catch ups after every meal and of course, the late night escapes into the city (MIL was extremely nice) and of course the extra help around the home.   It was bittersweet sending them off after three and half weeks.   Now I am back to my monologue with the girls especially when hubby is working nights.  I say its a monologue because most of the time it sounds like this:  do your homework, brush your teeth, wash already, yadda yadda yadda.  Sigh.


Now that we're back to our routine, its time to catch up on some backlog of food photos and catch up on some writing.  I missed last month's SABH License to Chill - I wanted to share some Filipino Ice Candy aka ice blocks but no matter.  Sydney's autumn scene is still a bit warm so maybe a time to showcase some summer tropical fruits is not yet too late.


The idea for this month's SABH theme (check out JJ's cocktail inspired indulgent Chocolate Caramel Tart!) came through my FB page when I saw this a couple of weeks mid summer.   They looked amazing and at the sight of it I thought, "Wow, that sure looks refreshing!"  I even bought the popsicle moulds. 


Now these challenges always make me excited.  As in giddy.  I prepared this cocktail popsicles on a warm Sydney autumn morning just after breakfast, hoping to slurp on this kick-ass popsicles by sundown.  But alas.  My hopes were let down. After 4 hours in the freezer, the popsicles were still icy and not solid enough to unmold from their cases.  Apparently, I used too much alcohol (initially it was 120ml limoncello.  I've adjusted the recipe below and added more of the ginger ale) . 

But a goal is a goal.  And a promise is a promise.  So by sundown, we've managed to get our asses kicked by this oh-so-punchy popsicle-turned-slushies.  It packs a punch, I tell you.  Maybe next time, I'll try and mix the slushies with some champagne.  Or maybe add a dash of Tabasco sauce?  Oh wait, hang on, that must the limoncello kicking in.....


To make this Strawberry-Limoncello slushie:
60ml limoncello
250ml dry ginger ale
250g punnet fresh strawberries, washed and hulled
Juice of 1 lemon


 Place strawberries in the blender.  

Add lemon juice, ginger beer and limoncello.

Process in a blender. 
Pour into 4 popsicle moulds.  Freezer for 4-6 hours.

(Since this popsicle adventure became slushies, we opted for tiny dessert spoons instead of a straw to make sure consumption is in moderation). 

The limoncello brand Chateau Hestia Limoncello (in the photo) is imported from the Philippines and is actual made of the local indigenous citrus fruit called dalandan and has 38% alcohol content.  We've had it before during our visit in 2010 and its truly something to take in moderation. Thanks to my cousin who sent them through the inlaws.


Tips:

* Mixture should only have 20 percent alcohol.  The higher the alcohol content, the less the mixture will freeze.  I learned that now.

* You can use shallow paper cups and fill them 2/3s full.  Once the mixture is a little bit solid, insert wooden popsicle sticks.

* This mixture were good for large sized popsicle moulds with extra to sip on.


So how was your weekend like?  Sydney's been warm and its already autumn.  But I'm not complaining.  My tropical blood is enjoying all this sunshine! 


Sunday, February 10, 2013

Shakshouka


I have a confession to make.  I am a noob at other culture's cuisines.  Sans the traditional Italian, Spanish, Japanese, Chinese, Vietnamese, Korean, Thai, Indian, Mexican, Malaysian and Greek dishes, when it comes to other cuisines, I am as clueless as a child.  You know the one who refuses to eat her vegetables and only eats naked pasta when allowed.  Growing up with a limited repertoire of available cuisines, it was either Filipino traditional dishes, American (steak and mash or hamburgers is the usual) or some pasta dish and the occasional tacos.  Eating out almost always took the Chinese or Japanese route or a fave pizza parlour complete with folk singers with guitar singing Puff the Magic Dragon and Horse With No Name.  


Malaysian, Vietnamese and Thai only came in early adulthood when restaurants started opening in Manila and showcasing neighbouring Asian cuisines.  So that was about a decade or so ago.  A far cry from the state of the restaurant industry in the Philippines these days.  Fusion of Mexican-Japanese  now exist, traditional Sri Lankan and a host of other gourmet fusions. There are cakes,  patisseries and chocolate shops that are at par with overseas counterparts. Filipino restaurateurs back home are showcasing Filipino food in a way that Heston  Blumenthal would plate a salmon dish at the Fat Duck.   Why there's even a franchise of Masterchef on local  Philippine television, and a live MC competition going on as I write this post.


Now being a noob in this day and age of technology is not acceptable.  Cooking shows attract a good following and reality cooking shows become the new Big Brother. Food documentaries, magazines, events, blogs!  Food has become as exciting as when TV broadcast its very first show.  Now back to me as the noob in this instance and learning how to cook (other dishes besides and a few other Filipino dishes).  This was a dish that I first saw from a TV show - yeah I know pathetic right.  And from there on, made it, made it, made it.  Hubby loves this.  I love it.  (The kids are not fans yet).  We make a cheats version with chorizo and tinned baked beans.  I love how versatile this can be and how its such an easy casual dish that can be served any time of the day.  


Just a week ago, I saw a good number of this dish in my IG feed and so a timely revisit to Shakshouka.   And so here is a recipe inspired by that TV show and a fave weekday meal at home.

 
To make this Shakshouka dish:
Print the recipe here

1 onion, sliced

1 red capsicum, chopped

1 green capsicum, chopped

4 Roma tomatoes, quartered

1/2 teaspoon sweet paprika (I used a Spanish brand)

2 eggs

olive oil

salt and pepper to taste


Method:

Using a cast iron pan (or any 20 cm pan), heat about a tablespoon of olive oil.

Add the onions and capsicum to the pan and cook till soft.

Add the tomatoes, stir and cook for two minutes.


Season with salt and pepper and half of the paprika and stir to coat the vegetables with the seasoning.

Turn the heat to low/simmer.

Using a wooden spoon, push aside some of the vegetables to make space for th eggs.
 
Crack the eggs into this space and let it poach until the whites are cooked through but the yolks are still runny.

Remove from heat and serve on the pan, with some toasted flat bread or any bread of choice.


Tuesday, November 20, 2012

Purple yam (Filipino ube) cake for the November SABH


The colour purple signals the middle of spring in Sydney. When jacarandas are in full bloom and every nook and corner is just alight with these purple beauties.  They’re gorgeous from afar and up close.  The downside is that these purple beauties don’t last long.  A few weeks after they bloom, they’re already down on the ground wilting away.   But never mind. Jacarandas are beautiful no matter what.


And so it goes without saying, my inspiration for this month’s Sweet Adventures Blog Hop hosted by JJ from 84th and 3rd, is inspired by this Australian flora.  The colour purple.  And its timing that it is my mother’s fave colour, and the weekend of the SABH coincides with my mom’s birthday.  And even though she’s in the Philippines celebrating with my dad and other family members, we celebrated her birthday here too.  With a cake that’s her favourite colour.  Purple yam cake (or Ube cake in Filipino parlance).


Ube or purple yam is an indigenous Filipino root crop.  Alongside the sweet potato, cassava or tapioca, parsnip, turnip and taro, the purple yam is a favourite ingredient in many Filipino sweets.  These purple beauties are added made into cakes, cupcakes, puddings, rice cakes, tarts or pastries,  flavoured in jams and preserves, topped in coldtreats, ice cream and even shakes!  As a matter of fact, they are used in more sweets than savoury dishes.  Considering it is infact a vegetable makes it for the perfect “vegetable” showcase for my post. Check out Jun Blog's post about this special vegetable and why Filipinos love it! 


Just some of the many purple yam products from the Philippines


To make this cake is like making any cake that uses vegetables (such as beetroot or cauliflower), you’ll need to cook the purple yam, mash them and pass through a sieve to get the finer texture.  

L: Frozen grated purple yam and R: Powdered dehydrated purple yam


But since it’s just a few of us around here, I’m sharing you a cheat version.  Sssshhhh!   I’ve used dehydrated purple yam powder, which I simply rehydrated with water, simmering for 20 minutes.  You can also buy frozen grated purple yam from Filipino stores and select Asian shops across Sydney. There is also that hint of purple yam essence which you can add for that extra bit of flavour and colour.  Otherwise, you can just use any food colouring combining red and blue till you get the perfect hue.  Without the colouring, you’ll get a very light purple cake, but still keep the purple yam flavour. So either way, you can’t go wrong.


You don't  need this much!  Just one bottle will do. I always just tend to overreact when food shopping!


There are a lot of variations on this cake around Google, but I was most inspired by this version from allrecipes.com and Pinay in Texas Cooking Corner sans the macapuno (Coconut sports) filling and using Italian buttercream as filling and icing.  Just because I like meringue-based frostings!  This cake has seen many afternoon teas and desserts and birthdays in our home.    


To make this purple yam (ube) cake
 Print recipe here

7 egg yolks

125ml vegetable oil

125ml fresh milk

1 cup grated purple yam

20ml (1 bottle) purple yam essence

2 ¼ cups plain flour

3 teaspoon baking powder

1 ¾ cups caster sugar

7 egg whites

1 teaspoon salt

½ teaspoon cream of tartar


Preheat oven to 178*C.  Grease and line the bottom and sides of two round 20cm cake tins.
In a large bowl, combine the dry ingredients: flour, baking powder, half of the caster sugar and mix with a whisk.  Set aside.

In a separate bowl, whisk the egg yolks, oil, milk, grated purple yam and purple yam essence. 
Add the egg yolk mixture to the dry ingredients and mix using a wooden spoon until they’re all combined (wet and dry combined). Set aside. 

In the bowl of your stand mixer, whip the egg whites and salt until frothy.  Add the remaining sugar and the cream of tartar and whip until you get stiff peaks. 

Gently fold the egg whites mixture into your purple batter until combined.  Fold gently to retain the aeration.  

Divide the batter into the prepared pans and bake for 30-45 minutes.  Do the skewer test.  It should come out clean.

Prepare your cooling rack lines with baking paper.  Immediately invert the cake pan onto the rack and leave to cool.

Once cooled, trim off tops and sides if necessary to get a uniform round shape.  Process the off cuts to make into crumbs.  Set aside.


To make the Italian buttercream, I used this recipe.


Assembly:

Place a paper doily on your cake tray and spread a tablespoon of frosting. This keeps the cake from moving around.  Place the first layer of cake on the doily.

Pipe the filling onto the cake using any kind of tip, or simply use a spatula and spread the filling evenly.

Place the second round cake on the filling and continue icing the cake sides and top.  

Using your hands, gently tap some of the crumbed off cuts on the sides of the cake.

Use remaining icing to decorate around the cake or the top.


There are other ways to make this cake.  You can use a rectangle cookie sheets with sides and make thinner cakes (cooking times will be less) and make a Swiss roll type of ube cake.  For the icing, you can use cream cheese frosting (sans the lemon) or a simple Creme Chantilly recipe (cream whipped with icing sugar and vanilla).  I believe any kind of white icing will work with this purple cake.


This lovely cake was showcased for dessert last weekend.  When the skies were blue, and the jacarandas in full view.  We had backyard barbeque with the family and some friends, ate and drank some, and listened to jazz and 80s music all afternoon.  Spring, weekends, barbeque, family, friends and cake.  What else could you ask for?


Tuesday, October 09, 2012

In my kitchen this October

I am joining the monthly series In My Kitchen hosted by Celia of Fig Jam and Lime Cordial starting October.  Every month, I quietly browse through all the lovely produce and books about food & gardening, kitchen utensils and other knick knacks  and food adventures from Celia and other food bloggers across the globe such as Bizzy Lizzy's Good Things, Life in Mud Sputtered BootsThe Clever Carrot, Lambs' Ears and Honey, Passion Fruit Garden, and so many more amazing bloggers.  So after awhile admiring from a distance, I thought enough of the stalking and why not join in the fun!  So here I am sharing my sanctuary that is my kitchen from this month on.

Our calamansi plant is looking lovely as ever.  Buds are sprouting and we're exciting to get some fruits in a few weeks.


Found these cute reusable doilies from IKEA.  They're washable too!

My fave. Roma tomatoes growing from an unlikely place - in between the nooks and crannies (tiles) of our front porch.

We've doing a trial with these guys - supporting local farmers by buying direct. But I'm not sure if they're better than if I get them straight from the local markets.

This lovely number was something I picked up from the roadside during a council clean up week.  A few brushes and cleaning and they're now holding my kitchen staples.

My latest recipe book acquisition. So many lovely recipes inside.


Finally picked up some Maggie Beer Sangiovese Verjuice from the weekend Masterchef Live event.  Excited to use them with summer fruits for compotes and coulis, and.....


Also from the Masterchef Live weekend, supporting Austalian produced sea salt flakes!  I'm imagining lots of dishes will be flavoured by these.


Another purchase from the Masterchef Live weekend - Caprino goats hard cheese from the Mornington Peninsula!  Lots and lots of savoury and sweet dishes running through my head.

I don't have a vegetable garden like Celia or a balcony garden like Mel, but would love to have one. And potted plants are my only option for now.  I need to wear one of them green gloves I think.  Maybe it'll help cover up my not-so-green thumb somehow.
 

LinkWithin

Related Posts Plugin for WordPress, Blogger...