Welcome to adobo-down-under!

Musings. Family. Food. Stories. Cooking. Recipes. Eating. A recipe journal. From simple Filipino dishes to challenging recipes and exciting gastronomical failures. This is for my girls to look back on for comfort, memories, laughs, love and lots of food!
Showing posts with label appetizers. Show all posts

Thursday, April 03, 2014

Salmon rissoles


As Lent is upon us, we like to eat more fish or seafood dishes this season.   As a Filipino parent, we try to instill in our kids traditions that we grew up with.  And as born Filipino Catholics, there's a lot of these traditions that come during Lent - from Ash Wednesday to Maundy Thursday to witness washing of the feet, to Good Friday to do the Stations of the Cross to Easter Sunday.   While we can't always do all these traditions because of timing and schedule, we do keep to our lenten sacrifice.


From Ash Wednesday, it's customary that we avoid eating meats on Fridays for the whole season of Lent.  In the past years, I have personally sacrificed eating meat for 40 days and it was a welcome change.   


Every year, each of the girls have their own fave food or habit which they sacrifice for the whole Lenten period.  Usually they give up chips, lollies, chocolates, soda, etc.  It's a good exercise of discipline as sometimes I forget and pack some in their lunch box, and then I get told off.  "Please don't add chips in my lunch box as I'm sacrificing that for lent, mum."  It's good for discipline and for the health too!


Now this is a fantastic option to our weekday or weekend menu.  Salmon rissoles.  They're easy and so inexpensive to make.  The recipe is adapted from Coles recipes.


Ingredients:


4 medium sized potatoes
 
30g unsalted butter
395g tin red salmon, drained and flaked

3-4 spring onions, chopped

1 cup breadcrumbs

zest and juice of 1 lemon

1 egg

1 cup corn flour


vegetable oil or light olive oil for frying


Method

Boil the potatoes until tender, 20-25 minutes.

Drain.  In a large bowl, mash the potatoes with 30g unsalted butter.

Add the flaked tinned salmon, bread crumbs, spring onions, egg, zest and juice of the lemon.

Mix and shape into patties.

Roll in corn flour and shake off excess.

Continue wth the rest of the patties.

Heat a pan on medium heat with enough oil for frying.

Pan fry the rissoles in batches, for 5-6 minutes or until golden.

Drain on paper towels.

Serve with garlic aoili (simply add crushed garlic into a cup of store bought mayonnaise) and a lemon wedge.


Tips and tricks:

*Variations on this rissoles, would be using tinned tuna or flaked smoked salmon;

* When shaping the patties/rissoles, make sure they are uniform in size to make cooking easy

* You can add other greens into the rissoles.  Chopped basil or chives will work great too.


Monday, March 24, 2014

Aussie-Asian smoked salmon rice paper rolls


We love fish and seafood,  and salmon is one of our family's favourites.  Raw or smoked, it's always a welcome treat in the lunch box, in salads and in our mains.  And I was just too happy to oblige to receive an invitation to the #huonsalmon blogger's competition sponsored by Huon Aquaculture
 
 
With salmon and my cooking style, I prefer simple and fresh.  As much as possible, I want the star of the dish to shine.  So it was a little bit difficult to think of a dish to make that's not already out there.  And this came to mind - Australian salmon meets Asian spring rolls.  This may be one too many of similar dishes out there, but I don't mind.  This was a welcome change to our usual fare.  I also added some Australian macadamias for that extra texture and to make it even more Aussie.


Ingredients

8 pieces rice paper rolls

1 Lebanese cucumber, deseeded and julienned

1 carrot, julienned

60 grams salted macadamias, roughly chopped

60 grams rice vermicelli noodles


Method

In a bowl, soak the rice noodles in warm water for 10 minutes.  Once soft and noodles have turned white, drain.
 
In a large bowl, combine the rice noodles, julienned cucumber, carrots and the macadamias.  
 
  Prepare a wide bowl with some water, and a dry tea towel on the counter.

Soak one rice paper roll in the water for 10 seconds or more until soft. 

Place the rice paper and pat on the tea towel, then on a cutting board.

Place a strip (or more) of smoked salmon on the rice paper roll.

Spoon some of the rice noodle-macadamias-cucumber-carrts onto the smoked salmon.

Fold the front end of the rice paper roll and slightly tuck to hug the filling, fold the right and left sides then continue to roll.

Continue with the rest of the rice paper rolls and the filling until you've used up all ingredients.


These can be dipped in simple soy-sauce or sweet chilli sauce, or you can also make your own Nuoc Cham sauce which is the traditional dipping sauce for the inspiration for this dish - the Vietnamese spring rolls. This sauce is adapted from SBS Food with some slight changes.
 
To make the nuoc cham sauce:
 
1 garlic
 
3 pieces red chillies
 
juice of 1 lemon
 
60 ml fish sauce
 
60 ml warm water
 
3 teaspoon raw sugar
 
1/2 teaspoon Worcestire sauce 
 
 
Grind the garlic and chillies in your mortar until you get a paste consistency.

Combine the fish sauce, water, sugar  in a bowl stirring until the sugar is dissolved.  

Add the Worcestire sauce and stir.

Add the garlic-chilli paste, stir and serve with your spring rolls.


Disclaimer: The writer (adobo down under) was invited to take part in the #huonsalmon blogging challenge and Huon Aquaculture has provided the products mentioned in this recipe. 


Tuesday, November 26, 2013

Mixed vegetable soba noodles salad with peanut sauce


Traditional Filipino cuisine does not have a lot of fresh vegetable salad dishes in its repertoire.  Most vegetables are cooked in soups or stews, some are steamed and served with a side of dip or some form of chutney or relish.  It's quite surprising because even with the warm tropical climate, cooked vegetables are almost always the only option in most homes across the island.  The reason is that while there are available salad vegetable varieties, they are pricey as they come from the upper north or the south where the climates are cooler.   

Growing up, I can't remember salads serve on the dinner table except for the usual tomato-onion-green mango that comes with a good barbeque, classic salads are only to be had when dining out in restaurants.  


Living in Australia has opened a lot of fresh green doors for me.  My kids are now accustomed to fresh salad and veggies on the table, lettuce in their sandwiches, cucumber slices in their lunch box... the works.  Especially as the season becomes warmer, fresh and cold salads are the best way to serve the day's healthy portions. 


Now the real hero here is the dressing, aka peanut sauce.  The soba noodles add the healthy protein touch.  This recipe is adapted from Pallavi Gupta through Honest Cooking.

To  make this salad just add vegetables which you are keen to eat fresh and raw - cucumbers, lettuce leaves, cherry tomators, grated carrots, slices of capsicum. You can just play around with the quantities.   But for this salad of 4 serves, I used:


Ingredients:

60 grams organic soba Hakubakku brand, cooked according to packet instructions then drained through cold running water.
(I used 2 bundles from the 90g pack)

half capsicum, julienned

6 pieces cherry tomatoes, sliced in two

1 cucumber, sliced

1 carrot, julienned

1 brocolli, stems removed

2 stalks of spring onions, sliced


For the sauce:

1/3 cup smooth peanut butter

1 red chilli, finely diced

1 clove garlic, finely diced

2 tablespoons sweet chilli sauce

2 tablespoons soy sauce

60 ml warm water (or less)

Combine the peanut butter, chilli, garlic, sweet chilli sauce and soy sauce in a bowl and whisk together.  Add the warm water a tablespoon at a time and continue whisking until you get the desired consistency of the sauce.

 Place the cold soba noodles in a large bowl, add the vegetables and toss together.  Drizzle the peanut sauce when serving.

Tips and tips

* You can add as many or as few raw/fresh vegetables in this salad.  Just make sure you slice them thinly (julienned).

* You can make the sauce as thick or as thin as you like, just add (or don't add) warm water as you prefer.  

* I made this a day ahead and it became think in the fridge.  I diluted it with a little bit of warm water and added a few more teaspoons of sweet chilli sauce to suit my taste.  


Perfect for the warm spring weather for a weekday lunch, entree or to accompany hot BBQ on a weekend.

Enjoy!


Tuesday, November 05, 2013

In my kitchen - November

I am joining this month's series of In My Kitchen hosted by Celia of Fig Jam and Lime Cordial.  It's a welcome break from the cooking and baking challenges and hops that I join and always a fun and lovely way to meet other kitchen enthusiasts.  Thank you Celia for hosting and hopefullly, I can continue on to join the challenge from here on.  


In my kitchen this month...  are these lovely smoked olives I got from the markets.  They don't have a brand or a name but they are made by a family who knows about smoked foods.  They also have smoked salmon fillets and they were divine!  I caught them at the North Sydney markets one weekend.  Their claim - these are the best taking olives in the galaxy!  I couldn't agree more. 


In my kitchen... is this tiny box of Ceylon tea fresh from Sri Lanka from an office colleauge who recently did the off-the-beaten-track road trip from Sri Lanka to India.  Food gifts are the best, don't you think?


In my kitchen... is this handsome fast and furious juice extractor.  I got sucked into it while browsing through the TV channels and I'm loving it!  I have a glass or two of nutriblasts a day!  Have you seen this on TV?  Or maybe you already own one?


In my kitchen.... are these two new ingredients I got from this wholesale shop I discovered just recently Oriental and Continental Foods.    This vanilla extract was only $4 and the tahini sauce is $3.  I got so many more stuff but these are worthy of mention.  And oh, they also have more than a dozen varieties of sea salt flakes - from pink Himalayan to citrus infused flakes.  


In my kitchen... is this lovely French wire basket/tray I scored from the local Scouts car boot sale recently.  I do love a good bargain when I see one. 


In my kitchen.... are bunches of these kale.  Not grown but bought from weekend markets.  Kale has been making its way in our kitchen since we bought the Nutribullet.  Well, kale and lots of the other green good stuffs.


In my kitchen... is this kneading mat. Something I bought ages ago but never used.  But since I've been making empanadas lately, finally this mat has seen the light of day.  More use of this in the next months.


Monday, October 28, 2013

Chicken liver adobo (pate)


This week is another chicken dish, but one that drives close to home - it is an adobo dish.  And involves a favourite of mine - chicken livers.  It's not one though that I always make at home as I'm the only person who eats it.  When my parents were visiting last month, we made this as my father is just a huge fan as I am.  I guess being of the offal category, chicken livers take a bit of effort to like, to love even.  Some get squeamish at the thought, and it was one of the reasons why I never thought of sharing the recipe in the blog.   It is quite an effort to make the photos attractive, so I have discounted the photos from the preparation to the cooking.  Even the cooked dish was not likeable no matter what angle.  So I thought I'd reinvent it a bit and make it pretty.


And I'm sharing the recipe as guest post at Debra's blog The Saffron Girl.


I first met (virtually) Debra through Instragram, following each other's food creations and me drooling at her travel photos.  I now stalk her on Facebook , Pinterest and Twitter. Hahaha!  Debra posts a lot of paleo and gluten-free dishes and I admire the passion she puts into each dish - she does a lot of research and tweaking and reinventing to adapt to her readers. 


I was first drawn to Debra's blog for the Spanish dishes which she makes as ode to her roots.  Why am I drawn to Spanish dishes?  Well, its because (and I have mentioned this in many many posts), it is my dream to travel to Spain and eat and drink and eat and drink and ......  Where did this come from?  I supposed from the history of the Philippines where I grew up and probably because I believe I may be a Spanish senorita in my previous life.  But that's just me. 


When Debra first asked if I'm interested to do a guest post, I was filled with excitement and nervous fear.  As it's something I have never done before, it was kind of daunting like sitting for a finals exam.  It took awhile for this to materialise, but it was actually fun and every bit worth it.


So, hop on down to The Saffron Girl and have a taste of this classic Filipino dish.  Reinvented and prepared for Debra's readers.


Thursday, March 21, 2013

Gambas al Ajillo


Ok.  So today I decided to brag about this dish.  Er. I mean blog about this recipe.  This was only after I realised this dish is not yet in my blog archives.  How can that be?  It's one of my all-time favourite dishes way back when - as an appetizer usually when out drinking with mates.  Back in the day.  And yes, at home too as a main dish.  Its a simple dish without the need for a recipe, really.  Just the basics of olive oil, garlic, chillies, parsley and good ol' salt and pepper.  Its actually one of those dishes which you can re-create on your own just by tasting the dish.  You know those times when you eat something at a restaurant that looks easy enough and you try to replicate it at home.  Well, this is like one of those.  Actually just look at the picture and you will already know what to do.


Gambas al Ajillo is a Spanish dish which originates from the South of Spain and it is really a tapas dish - an entree or appetizer.  A long time ago, when I took a short Spanish cooking class at the Sydney Seafood School, this was one of the tapas dishes we prepared.  Intentionally, I enrolled to learn the basics of paella.  And it was a bonus to learn two other tapas dishes  - this one included.  An easy Spanish tapas dish which is already a hit every single time.   When I organised the Taste of Harmony lunch at work and asked everyone to bring a dish from a country they want to visit, I initially thought of making Tres Leches Cake because one of my dream is to visit South America and trek the Machu Picchu. But I also would love visit Spain and making this was easy enough on a weekday morning. 


To make Gambas al Ajillo

500g prawns - washed, peeled and deveined

3 cloves garlic, crushed and chopped finely

2 birds eye chillies, chopped finely

1/2 cup flat leaf parsley, roughly chopped

3 tablespoons light olive oil

salt and pepper to taste


Method:

Heat olive oil in a skillet or pan.

Add the garlic and cook until soft but not brown.  
(Do not burn as your dish will taste bitter)

Add the prawns and stir until cooked through.

Add the chopped chillies and stir.

Season with salt and pepper.

Top with the chopped parsley.

Serve with toasted crusty bread.


Taste of Harmony lunch feast at the Office


I'm grateful that I work in small organisation and coercing everyone to bring a dish with a theme was too easy.  Everyone had a good lunch celebrating with lots of food and stories to share.

 * Taste of Harmony is an initiative by the Scanlon Foundation whose vision is to enhance social cohesion in Australia.  TOH is an annual event which encourages workplace colleagues to share food and stories from different cultural backgrounds.


Sunday, February 10, 2013

Shakshouka


I have a confession to make.  I am a noob at other culture's cuisines.  Sans the traditional Italian, Spanish, Japanese, Chinese, Vietnamese, Korean, Thai, Indian, Mexican, Malaysian and Greek dishes, when it comes to other cuisines, I am as clueless as a child.  You know the one who refuses to eat her vegetables and only eats naked pasta when allowed.  Growing up with a limited repertoire of available cuisines, it was either Filipino traditional dishes, American (steak and mash or hamburgers is the usual) or some pasta dish and the occasional tacos.  Eating out almost always took the Chinese or Japanese route or a fave pizza parlour complete with folk singers with guitar singing Puff the Magic Dragon and Horse With No Name.  


Malaysian, Vietnamese and Thai only came in early adulthood when restaurants started opening in Manila and showcasing neighbouring Asian cuisines.  So that was about a decade or so ago.  A far cry from the state of the restaurant industry in the Philippines these days.  Fusion of Mexican-Japanese  now exist, traditional Sri Lankan and a host of other gourmet fusions. There are cakes,  patisseries and chocolate shops that are at par with overseas counterparts. Filipino restaurateurs back home are showcasing Filipino food in a way that Heston  Blumenthal would plate a salmon dish at the Fat Duck.   Why there's even a franchise of Masterchef on local  Philippine television, and a live MC competition going on as I write this post.


Now being a noob in this day and age of technology is not acceptable.  Cooking shows attract a good following and reality cooking shows become the new Big Brother. Food documentaries, magazines, events, blogs!  Food has become as exciting as when TV broadcast its very first show.  Now back to me as the noob in this instance and learning how to cook (other dishes besides and a few other Filipino dishes).  This was a dish that I first saw from a TV show - yeah I know pathetic right.  And from there on, made it, made it, made it.  Hubby loves this.  I love it.  (The kids are not fans yet).  We make a cheats version with chorizo and tinned baked beans.  I love how versatile this can be and how its such an easy casual dish that can be served any time of the day.  


Just a week ago, I saw a good number of this dish in my IG feed and so a timely revisit to Shakshouka.   And so here is a recipe inspired by that TV show and a fave weekday meal at home.

 
To make this Shakshouka dish:
Print the recipe here

1 onion, sliced

1 red capsicum, chopped

1 green capsicum, chopped

4 Roma tomatoes, quartered

1/2 teaspoon sweet paprika (I used a Spanish brand)

2 eggs

olive oil

salt and pepper to taste


Method:

Using a cast iron pan (or any 20 cm pan), heat about a tablespoon of olive oil.

Add the onions and capsicum to the pan and cook till soft.

Add the tomatoes, stir and cook for two minutes.


Season with salt and pepper and half of the paprika and stir to coat the vegetables with the seasoning.

Turn the heat to low/simmer.

Using a wooden spoon, push aside some of the vegetables to make space for th eggs.
 
Crack the eggs into this space and let it poach until the whites are cooked through but the yolks are still runny.

Remove from heat and serve on the pan, with some toasted flat bread or any bread of choice.


Thursday, January 10, 2013

Spinach balls


After all the Christmas trimmings and tidying up happened there appears to be what now seems to be an empty space in the lounge room.  There was the tree and all the presents underneath.  A tub full of Christmas cards and trimmings.  A box of wrappers and sticky tapes.  Lots of toys scattered about and shoes and lollies if you may.  What used to be a corner full of excitement and chaos and cheer and colour is now empty.  Ah the holidays.  It brings so much excitement that its always bittersweet to part with the spirit and get on back to routine.  When's the next holiday again?


So.  Its the new year and tidying up the trimmings also meant tidying up some electronic backlog.  Photos untouched and recipes left unwritten.  And this post is one of those! I've been meaning to share after meeting the maestro of Italian cooking last October - the other half of the two greedy Italians Antonio Carluccio.

The Maestro is how he is in person as he is on television.  Jolly, unpredictable and full of laughs. He shares a joke or two through out the Sydney World Chef Showcase session I attended and was just as funny as he on stage and face to face, when I had my book signed.  This recipe which he shared and prepared on stage was something he created for a book 25 years ago, but has since used it for many other dishes, including as a vegetarian pasta dish or even layered in a vegetarian lasagna.


To make these spinach balls, I've halved the recipe to make 12 spinach balls. 
You can make 24 balls simply by doubling the ingredient quantities.

(Print the recipe)

250g spinach, washed

1 egg, beaten

pinch of freshly grated nutmeg

1 clove garlic, finely diced

50g breadcrumbs

25g grated parmesan

salt and pepper to taste

olive oil for shallow frying


Blanch the spinach in a pan of salted boiling water for 2 minutes.  Drain using a colander.

Using your hands, squeeze out the water from blanched spinach.  Then chop the spinach finely.

Place the chopped spinach in a bowl and stir in the rest of the ingredients: salt, pepper, eggs, breadcrumbs, parmesan, garlic.  

Mix well until you get a binding consistency - the ingredients are binding together. If the mixture is too wet, add a tablespoon of breadcrumbs.

Roll the mixture into little balls.

Prepare and heat a shallow pan and cover the base with enough olive oil for frying.

Shallow fry the spinach balls in the hot olive oil until golden, 3-4 minutes per side.

Drain on kitchen paper and serve warm (or cold).


These little spinach balls are so good and healthy too! Eaten by themselves or dipped into your favourite sauce (mayo, catsup, sweet chilli sauce, etc) I reckon they're great as appetizers especially during this summer for those backyard parties!  Also a great dish to bring to any party.  Hot or cold, they are divine!  After all, they were created by none other than one of the greatest cooks in this century.

So when's the next holiday again?  How about Australia Day!  These would be great in that picnic basket, don't you think?


Friday, August 03, 2012

Carrot galette

"Carrots are divine, you get a dozen a dime.  It's maaaa-gic!" - Bugs Bunny


There's some wise words there.  From one of the most influential characters in the animated world.  I reckon its because of Bugs Bunny that carrots are usually the first vegetable the children learn to love.  But seriously, what's not to love about the humble carrot.  They are the most versatile vegetable in the world!  In the universe, even.  You can roast them, add them to braised and stews and casseroles, boil them, mash them, fry them, grill them.  And they're not just confined to savoury dishes, they're also great in cakes!  So what's not to love!  They come in lots of lovely shapes/size and colours too!  Have you even seen a purple carrot? They're the next super food says The Age.

Daucus carota sativus nicknamed carrots as everyone already knows, has beta-carotene (Vitamin A) which helps maintain good eye sight.  They're also rich  in fiber, antioxidants and minerals.  There's an urban  legend  which originated among British gunners from the Royal British Airfoce during World War II that says "eating carrots can allow one to see in the dark."   Fact or fiction?  Who knows?! But let's not go there. 


Here's a carrot recipe adapted from a local supermarket's magazine -  Coles.  It's super easy to make using store-bought puff pastry I used the local brand Careme which is absolutely positively the best!).  You can also use any kind of cheese you fancy and any of your favourite herbs.  I've halved the ricotta called for in the original recipe and used bocconcini  and used dried oregano instead of fresh ones.  Served alongside your main or as a starter.  They're gorgeous and packed full of healthy stuff.  The humble and versatile carrot is the feature for Week 8 of the Power Foods blog hop organised by Mireya of My Healthy Eating Habits.


To make this Carrot Galette,  you'll need

a bunch of Dutch carrots

olive oil or canola spray

375g block of frozen puff pastry, thawed

150g fresh ricotta cheese

150g bocconcini

finely grated lemon zest of 2 lemons

1 teaspoon of dried oregano

salt and pepper to season


Preheat oven to 180*C.  Line a baking tray with non stick baking paper.  

Wash and scrub carrots and trim the top leaves.  Cut into half lengthwise.  Arrange on a single layer on a tray and spray lightly with oil.  Roast for 10-15 minutes until just tender. Set aside once done.

On your kitchen bench, roll out the pastry.  Crimp the edges and using a butter knife, light score a line on the edges to create a border.  

Using a fork, prick the area inside to create air pockets.


Combine the cheese, zest (and half the fresh oregano if using fresh) in a bowl and season with salt and pepper.

Spread the cheese mixture on the pastry.  Arrange the carrots on the cheese mixture, then sprinkle with the dried or fresh herbs.

Bake in the oven and cook for 20-25 minutes or until pastry is crisp and golden brown.


This post is part of a Power Foods blog group.  Check out Mireya of My Health Eating Habits and the other Power Food posts from Alyce from More Time at the Table, Ansh from Spice Roots,  Casey from Bookcase Foodie, Jeanette from Jeanette's Healthy Living, Jill from Saucy Cooks, Martha from Simple Nourished Living and Sarah from Everything in the Kitchen Sink.


If you are a blogger and would like to take part in this blogging group about Power Foods: 150 Recipes with the 38 Healthiest Ingredients from the editors of at Martha Stewart's Living Magazine, please get in touch with Mireya at mireya@myhealthyeatinghabits.com for details. 


Friday, January 20, 2012

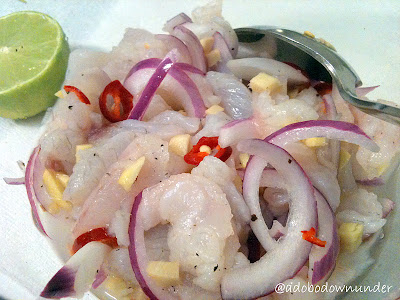
Snapper ceviche (Snapper Kinilaw in Filipino)


Learning kitchen skills was one of the things I looked forward to when I started my course in Kitchen10.   And filleting a fish was one of the highlights last year.  Right up there in the top 3.  Its not easy,  but with the right equipment (a filleting knife) and a lot of practice, it can be a breeze!  I’ve tried doing it at home more than a dozen times already.  But when I’m head to head with a fish, it still gets kind of intimidating!  Those nano seconds can get really entertaining, but we get on and fast forward a few minutes after, voila. We have a significant amount of flesh to consume.   So I did not completely mess the fish after all.


This is so easy to prepare.  15 minutes, tops!  If and when you find yourself in the Masterchef   kitchen and there's that 10 or 20 minutes pressure test, this simple, fast and furious dish should be one of those up your sleeves.  Just don't put too much chillies or it'll make George sweat up a storm.

To make this simple snapper kinilaw or ceviche, ask your fishmonger to fillet the fish for you.  Half of the job is done already.  


Fillet of 1 medium sized snapper, sliced thinly or strips
Half of red onion, sliced
2 knobs (thumb-sized) ginger, diced
1 birds eye chilli, chopped
Juice of half a lime
60ml or ¼ cup white vinegar
Salt and pepper to season (optional)

In a medium sized bowl, stir the ingredients together. Add the fish slices and stir gently to coat the fillets.  Let the fish soak for 5-10 minutes.

You can opt to serve the fish with the vinegar mixture or without it.


You can make a bigger serve of this, with a bigger fish.  Just let your taste buds guide you with the marinade.  As a rule, the vinegar should just be enough to soak all the fish, not to cover them completely.

Make this a few minutes before you intend to serve them.  As the longer the fish soaks, the more its cooked by the acid in the vinegar.  And the longer it’s soaked, the flesh gets flaky and will not be as good.

In the Philippines, the fish variety locally called “tanigue” (also known as seer fish or wahoo) is used to make this dish. But because this one is made in Australia, I’ve used whatever is the locally available white-flesh fillet variety.  I’ve never tried making this dish with other fish varieties, but in various parts of the Philippines, kinilaw or ceviche can also be prepared using fresh anchovies and oysters.

This is a Filipino appetizer, usually served where beer is on the menu.  Add some rounds of karaoke there, and you’re definitely in Pinoy surrounds.

Here’s a useful link about varieties of fish and general cooking method. 

Saturday, November 12, 2011

Tartlet of caramelised onions with clotted cheese and roasted tomato


It has been an exciting week!  After the fabulous day, my tweeting ability has multiplied a thousand fold.  Well, maybe exaggerating a little bit. But still learning.  This was in my twitter timeline on Friday" #ff.  And embarrassing as it may be to admit it, but I had to consult good ol' friend Google.   I'm hopeless, but will keep up.  Technology is amazing!

Now going back to the kitchen, these entrees were from last week's Lesson 4 in Kitchen 10.  Was on the roster for entrees/appetizers.  And this kept me going from 3-7pm.  It did take that long, including resting the dough, blind baking the pastry, making the clotted cheese, roasting the tomatoes and cooking the caramelised onion.    What made it exciting was cheese making and making the short crust pastry - a first time for this Pinoy chef wannabe.   And while its seems overwhelming to look at the long list of ingredients and to do's, this can be done in a home kitchen on a weekend.  Who say's multi-tasking is only for the corporate environment?


ready for service

Enough of the chit chat!  Let's get to work!  First things first!  Savoury short pastry!

125ml water
250g unsalted butter
500g flour
1/4 tsp salt

The basics of short savoury pastry: 1-2-4: meaning one part water, two parts fat, four parts flour.

Cut the butter into small cubes, and rub the flour with the butter in a large bowl until it resembles fine crumbs.  (This is something that doesn't happen in a rush.  You need to rub rub rub the flour and butter for a good 15-20 minutes to get good results.  You know you're done rubbing when there are no more big lumps of butter, instead of you have a bowl of grainy flour).

Add the salt and the water and mix together using your hands.  You will create a soft dough.  
Do not overwork.  

Wrap in cling plastic and rest for 30 minutes in the refrigerator.

After resting, grease the tart pans with butter or oil spray. Line the pastry onto the pan, cutting edges with a kitchen scissor then press firmly.

the dough pressed onto 8cm disposable tins

 Cut out round or square baking paper and lay these onto the pastry.  Use baking beads or beans and pour these onto the pans.  Bake blind for 15-20 minutes in a 200*C preheated oven.


the pastry ready to be baked blind using mixed beans

The pastry is ready when they are golden and are easily lifted off the pan/molds.

Set aside to cool.


Its time to make the fillings!  Roasted tomatoes first!
 
5 large Roma tomatoes
1/4 bunch thyme
salt and pepper

Cut the tomatoes into quarter.  Season with salt and pepper and chopped thyme.  

Place on a baking sheet or roasting tray and slow roast at 140*C for approximately 40 minutes.


And while the tomatoes are roasting in the oven, prepare the caramelized onions.

200g (about 2 medium sized) Spanish onion, sliced
1 garlic clove, minced
20g brown sugar
1/4 bunch basil
50ml olive oil
20ml balsamic vinegar


In a medium sized pan, sweat the onions with garlic and olive oil.

When cooked (onions have softened), add the sugar and caramelise, add vinegar and seasoning.   

Set aside in a plate or bowl and cool.


To serve: arrange the caramelised onions and roasted tomato in the pastry.  Serve topped with clotted cheese and some basil leaves. Or if you're not making the cheese, fresh ricotta or some crumbled feta would be just as great.


Have a great weekend everyone!  And while we're still coasting through the middle of November, best to get on with some Christmas shopping! 

LinkWithin

Related Posts Plugin for WordPress, Blogger...