Welcome to adobo-down-under!

Musings. Family. Food. Stories. Cooking. Recipes. Eating. A recipe journal. From simple Filipino dishes to challenging recipes and exciting gastronomical failures. This is for my girls to look back on for comfort, memories, laughs, love and lots of food!

Thursday, December 29, 2011

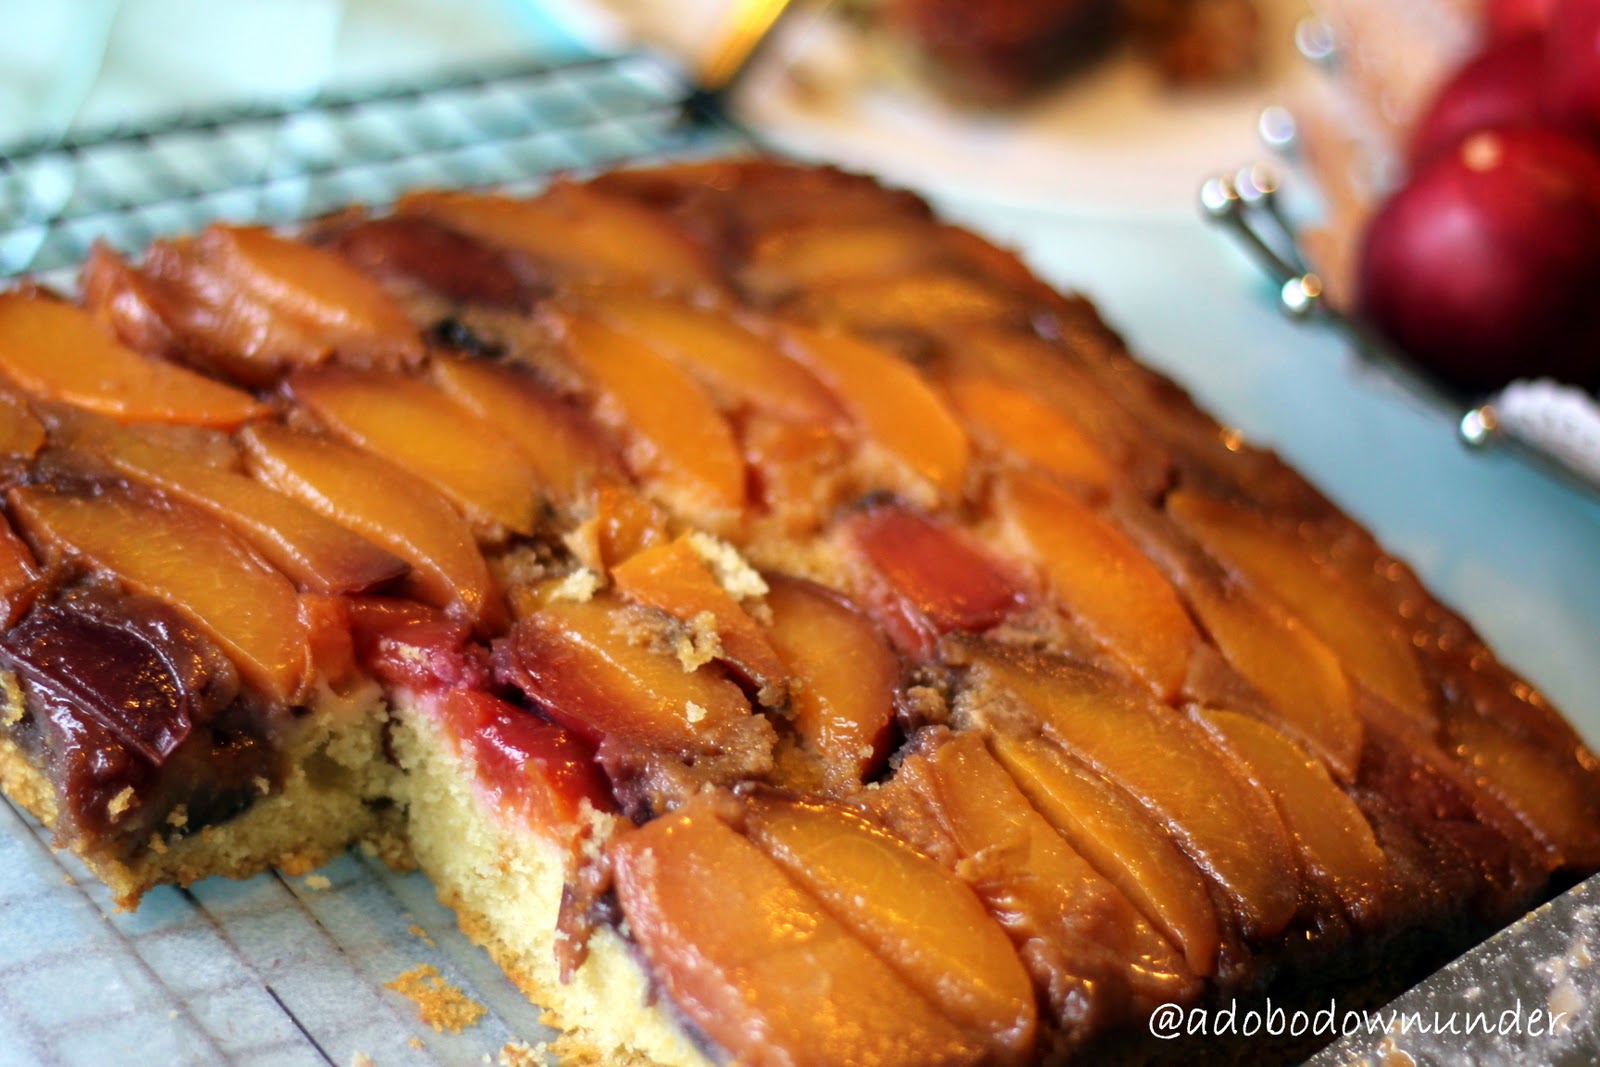
Nectarine upside down cake


"All the world's a birthday cake, so take a piece but not too much." - George Harrison


December birthdays are always so festive.  Actually the whole world becomes festive in anticipation of Christmas, which an office colleagues declares as unfair because everyone gets side tracked, except for the celebrants themselves.  It never occurred to me but it does happen.  Every year, I take the day off on my birthday and what do I do?  Christmas shopping for everyone else!  After a few hours of self-centered activities (a spa trip or dinner), the rest of the day is spent buying Christmas presents for every one else.  Christmas is my favourite time of the year, that's why!  

But birthdays should always be special and unique every year.  And birthdays mean cake.  So this year the girls helped me make this one.  A special summer birthday cake with nectarines, inspired from a Midwest Living recipe found through Pinterest.


Nectarines are very new to us.  They're peach-like taste appeals to the girls as much as their  quirky pits.  We love the yellow variety more than the white and buy them by the box full!  There are no fresh nectarines or peaches in the Philippines.  If there are, they will cost a fortune and are usually imported from  the US or Australia.  These are the local stone fruits we've grown to love come summer here in Sydney.  Along with Australian white and yellow peaches and cherries and mangoes!  My girls love these fresh and these are lunch box regulars soon as the early signs are visible at the local fruit shops.  But sometimes, we get too excited and everyone gets over-nectarised.  So instead of throwing them away, we keep them in the fridge and this time took David Lebovitz' advice to make use of fruits in baking when they are in season!  So here goes our nectarine upside down cake!


5 medium sized nectarines, pitted and sliced
60g unsalted butter
1/2 cup brown sugar, packed

150g plain flour
1 1/2 tsp baking powder
1/4 tsp salt
120g unsalted butter, room temperature
150g caster sugar
1 egg
1 tsp vanilla extract
125ml milk

Preheat oven to 175*C.  

Melt the butter in a small saucepan on the stove, or using the microwave.
Mix the butter with the brown sugar.  Pour and spread evenly into a 20cm round or square cake tin.

Place the nectarine slices on the brown sugar mixture and set aside.


Square cake tin.  Brown sugar and butter love!

Don't be too stingy with the fruit!  Spread them over the brown sugar mixture as much as you like.  No rules here.

Sift the flour, baking powder and salt into a medium bowl and set aside.
In a large bowl using a hand-held beater or the bowl of a stand-mixer, cream the butter until soft and creamy.

Add the sugar and beat until combined.

Add egg and vanilla and continue to mixing for about 1 minute.

Alternately add the flour and milk in three batches, slowly mixing together with each addition.

Pour into the prepared tin/pan and bake in the oven for 45-50 minutes, or until a skewer comes out clean.

Cool on a wire rack for 5 minutes.  To loosen cake, slide a butter knife on the sides of the cake pan and invert onto a large serving plate.  Cool for a further 15-20 minutes.


Cooling cake, waiting for some loving!


The cake had that slight hint of ripe nectarine (which could be a put off to some) and red skin added a tinge of colour to the caramelized topping. This looked and tasted like the festive cake that it is.  Moist and sweet and lovely addition to our cake repertoire.  Who say's upside down cakes have to be always be pineapple?  
Aahh. Birthday happiness. 


Tuesday, December 27, 2011

A how to post - blanched almonds


Not the most exciting post there is, (but I reckon this post has the most photos!) but its something learned from Kitchen 10 so worthy of a post.  When making the almond bread recently for home consumption and as edible gifts,  instead of buying already-blanched almonds, we did the blanching ourselves.  Just because there are some things we must try.  If not develop the habit out of it, the trying part always becomes a worthy experience – whether it’s a disaster or a success.  Trying something for the first time should always be in one’s to do list.  It doesn’t have to be grandiose and adrenalin-rushing adventures.  It can be anything . Even as simple as poaching an egg, or blanching some almonds. 
 
Pour the almonds into the boiling water

Not much to say here as blanching is what it is – blanching.  Boil some water, add the food item and let it sit for about 5 minutes, scoop out with a spider or slotted spoon and voila – blanched food!  It can be anything from green beans to broccoli to well, almonds!


The skins get loose in a few minutes. Take off from heat at this point.


The skins easily peeled off.  Can you make out my finger prints? Think I'm giving too much away!

Pinch away and voila - naked almonds central!

To peel the skins off, simple pinch the almonds and let it slide from your grip away from the skin.  The girls loved helping out taking the skins off which had us left with just enough almonds to bake with.  One of life’s simple pleasures – spending time with your kids in the kitchen, helping out as much or as little as they can, eating as you merrily along before a distraction such as TV and DS games breaks the scene and you’re back to your own quiet measures.

Naked almonds and their skins.  Yin and Yang.

Skins!  Off to your compost bin if you have one or straight into your garden bed!

Saturday, December 24, 2011

Green happiness. Buko (coconut) pandan sweet salad. Festive Favourites Blog Hop


Sweet coconut and pandan salad


I got excited when the hostesses of the Sweet Australian Adventures announced another blog hop with the theme Festive Favourites early this month (with this month's host 84th and 3rd).   So excited that all visions of sugar plums danced in my head.  Well, not quite exactly those but all these Filipino festive favourites - bibingka (native rice cake topped with  cheese or salted eggs), puto bungbong, leche flan, buko pandan and the Filipino tropical fruit salad.  But getting carried away is my middle name.  I had bought all the ingredients to make the bibingka but  never quite got to make it after my macadamia obsession and the endless caramelizing demand got the better of me.  It's the silly season after all.  So after careful bibingka planning even to the extent of buying 3 packs of banana leaves, I've taken the easier route.  To spread  some green pandan happiness. No baking involved.  Just a lot of chilling and stirring.  Cool, right?


This is a favourite in our home but I've never quite gotten to actually making it.  In Manila, my brother in law has a special supplier where he gets tubs of these for parties.  And its totally the best there is.  But we don't have Nathaniel's here so making the salad dessert was the challenge of the day.


If you're keen on making this, you'd have to make a trip to your local Asian or Filipino shop, if there's any close by and get some: nata de coco , buko pandan essence and Alsa Green Unflavoured Gelatin.  And while you're there, you can also check if they have frozen pandan leaves and frozen young coconut strips. Otherwise, you can take the challenge further and get some fresh coconut from the market. 

Nata de coco - more green love


2 - 90g box of Alsa  green unflavoured gulaman (or any unflavoured green gelatin)
3 pandan leaves
few drops of buko pandan essence
1 900g jar nata de coco (doesn't have to be green), drained
4 packs 454g packs  frozen young coconut strips, thawed and drained
300ml thicken cream
1 395g can sweet condensed milk


More greens - buko pandan essence, pandan leaves in knots and the Alsa Gulaman (gelatin powder)

Frozen young coconut strips


To make:  First stop - gelatin.

Prepare according to packet instructions and quantity - using a small pot boil the water with 3 pandan leaves.

Add the gelatin mixture and continue to mix until gelatin has dissolved.  Remove pandan leaves and pour into molds.  Chill for an hour or until just set.
 
Once ready, gently cut into small cubes. Set aside.


Pot with the green wonder - gelatin and pandan leaves
 

Setting in the traditional Filipino llanera - aluminum oval pans


Assembling the salad
In a large bowl, pour the drained young coconut strips.  Add the nata de coco, condensed milk and cream. Stir gently to mix the ingredients together. 

Add about some drops  of the buko pandan essence (about a teaspoon but not too much as it can be overpowering) and the chilled gelatin. 

Gently stir as you don't want to ruin the pandan gelatin.


Pour into plastic recyclable containers and freeze overnight.
Thaw in the fridge for an hour or more before serving.

The gelatin added last - stirring gently


Ready to freeze in recyclable containers

 
One can't get enough of green happiness, I reckon!  Especially during the silly season!  A very merry Christmas to you all!  I wish you all a festive feast shared with family and friends!  And if you're in Sydney during the Christmas break, why not drop by and share some Filipino festive favourites.  You might also like to belt out a few songs with the karaoke/videoke.  We do have a magic sing at home!    


Maligayang pasko  sa inyong lahat!  
(A merry Christmas to everyone!)


This is a blog hop.  Click on the links below to see all amazing festive desserts created by other food bloggers arounds the globe!


LinkWithin

Related Posts Plugin for WordPress, Blogger...