Welcome to adobo-down-under!

Musings. Family. Food. Stories. Cooking. Recipes. Eating. A recipe journal. From simple Filipino dishes to challenging recipes and exciting gastronomical failures. This is for my girls to look back on for comfort, memories, laughs, love and lots of food!

Wednesday, August 31, 2011

Buttered rosemary dinner rolls

Slight burned top - buttered rosemary dinner rolls from PW


I  am getting addicted browsing Pinterest.  Its so inspiring to see so much beautiful food, awesome places to go to, DIY projects to do, fashion, and just about anything that’s amusing to the senses.  The creator of this great website is a genius!  Pinterest is a place where you create your own virtual pin board (just like you would have at home) and pin just about anything that inspires you.  I’ve created a board for food that I might want to tackle in the kitchen someday, DIY projects that I might want to for the home and with the kids, travel places, awesome images, and so much more.  It’s suddenly replacing my obsession with FB.  I know, right.  At this age, its not right.  Well, I’m not really FB obsessed, but I browse there every day – just for the sake of getting in touch with family and friends overseas really. 


And how in the name of bread and butter did I get hooked on Pinterest?  It’s because of these bread rolls!  As I said, the photos in Pinterest are so inspiring, this has inspired me to: make the cinnamon rolls, so that I can have the dough for these buttered dinner rolls, and it also sent me hunting for a good 20cm cast iron pan, which I eventually got from Amazon (of all places!) and so now these glorious breads are waiting to be made and eaten, and made and eaten, and made and eaten.  It’s the cycle that must BE. 


Pale version of the dinner rolls - too excited to get these off the oven!
 
When I found this recipe, I just had to make it.  But I didn't have the cast-iron skillet and so had to procrastinate much longer.  But we've tried it at home several times already even before the 20cm  cast iron pan arrived.  First using a basic stainless steel 30cm pan (photo above), and then using a  large cast iron pan  - 27cm and baked as regular dinner rolls (below).

A golden brown version - using a bigger cast iron pan, 27cm


I'm not sure why but PW's rolls are so much smoother than mine.


To make these dinner rolls, I used the dough from the Cinnamon rolls recipe (which I also got from PW).  I actually made more cinnamon rolls, just so we could get our hands on this dough!

Melted butter, for brushing
sprig of rosemary, chopped from the stems
sea salt

Using a 20cm cast iron pan/skillet (or maybe a 20cm round baking pan will do fine - although I haven't tried), brush the pan with some olive oil using paper towels and smooth it over.

Scoop a large spoonful of the dough and roll into rounds.  Place in the pan about 7 pieces with enough space to expand.  Let it rest for 20-30 minutes, covered with a tea towel in a warm place (I place them in the microwave).

Brush some butter over the rolls, and sprinkle the rosemary and some salt.

Bake in a preheated  (180 degrees C) for 15-20 minutes or until golden.

Brush some more butter before serving.


The buttered rolls - spread with some more love (butter!).  The look like scones!

Sunday, August 28, 2011

Beef Kaldereta Sauvignon


This Filipino recipe is a favourite of Dad’s.  The basics of this dish is the beef, stewed in a tomato based sauce till tender-come!  Much like the French Beef Bourguignon made famous by Julia Child and the American beef casserole.  But also different in a lot of ways.  The classic beef kaldereta includes liver spread, which gives it that extra flavour.  It also does not include wine.  Other people add a bit of twist to the classic by adding some capers or olives to give it that Mediterranean touch.  There is also differences in the cuts of meat used.  Usually, I use beef shin or beef ribs – which takes a bit of cooking time. 


With our heavy dutch oven Le Chasseur, there’s no need for pressure cookers to tenderise the meat before cooking, as this amazing pot, from experience, lessens cooking time by half.  And so it is great when making kaldereta.    I’ve made this beef kaldereta for a weekday dinner, and added a bit of French, well Australia in it, with the addition of a cup of Cabernet Sauvignon.  From my blurb on the Wynn’s brand from South Australia.  And did I also mention I have secret sauce for making stews? Ssshhhh... I use herbed pasta sauce!


To make this beef kaldereta, you'll need:

1-1.5k beef ribs
3 cloves garlic, minced
1 large onion, sliced
3 medium-sized potatoes, cubed
2  medium carrots, cubed
half of a large red capsicum, diced
half of a large green capsicum, diced
3 tbsp tomato paste
1/2 cup red wine
2 bay leaves
vegetable oil
salt and pepper to taste


Prepare a large pot with cold water, add in the beef and bring to a boil.  Simmer for 45 minutes to an hour, skimming every few minutes for fat and impurities.  Once beef is tender, take off from heat and transfer the meat in a plate or bowl.

Heat a large skillet or pan, add vegetable oil and saute the onion and garlic until soft. 

 Sear and brown the meat, then add the tomato paste.  

Stir until meat is coated, then add the potato, carrots, capsicum and bay leaves.   Add the pasta sauce and stir to allow the sauce to coat the meat and vegetables.  

Add 4-5 cups of the beef stock (use the stock used to tenderise the beef) and bay leaves. Bring to a boil, then turn down heat to medium and simmer for 10 minutes.


As usual, serve with rice.  But I reckon, this beef kaldereta in red wine, can also be served with some sliced sour dough, for a bit of change.


PS - Pasta sauce is a great base not just for pasta dishes, but for stews and casseroles as well.  I use the Raguletto Napolitana in almost all other tomato based dishes we make at home, not just limited to lasagna and bolognese.  


Friday, August 26, 2011

Pork chop steak


Rice is a staple in the Filipino home.  Just like the "tabo" in the bathroom and a karaoke/videoke unit in the lounge room, there is the rice cooker in the kitchen. 


A day without rice will make hubby weak, like the effect of kryptonite to Superman.  Its just not normal.  Although we do have pasta dishes in-between days and have the usual pizza take-away or a taco weekend dinner, RICE must always be on the menu the day after these episodes.  Otherwise, wrath will set in.  I'm kidding of course.  But you can imagine the seriousness of what I'm talking about here, do you? Rice to us, is bread to others.   And because rice is a staple and a regular side, we have an endless supply of mains.  Maybe a lot of them have more similarities than differences in terms of ingredients and preparation. Some are exotic and unique, others just a replica of some foreign dish brought about by the influence that country made in Philippine shores. 


This pork chop steak is a take off from the Tagalog Beefsteak - a beef dish marinated in calamansi (an indigenous Filipino citrus) and soy sauce, fried separately then served with sauteed onion rings.  


1k pork chops
1/2 cup light soy sauce
2 cloves garlic, crushed
1 lemon (an original version of this would use calamansi)
1 large onion, sliced (like rings - see photo)
vegetable oil

Marinade the pork chops in soy sauce, garlic and half of the lemon.  Let it sit for half an hour.

Heat a skillet or fry pan, add vegetable oil and shallow fry the pork chops in batches, 3-4 minutes on each side.  Set aside on a serving dish or plate.

Saute the onion rings in the same pan until soft.  Add the pork chop marinade and simmer for 5 minutes. Squeeze the other half of the lemon.  Pour on top of the pork chops.

Best served with, do I need to say it?.... RICE!

Wednesday, August 24, 2011

Sauteed Mung Beans (Ginisang Munggo)

The simplest Filipino dish one can learn.  This is a versatile beans-based dish that is a common side to shallow fried pork chops or mackarel. It is uniquely Filipino but can be compared to the likes of the Indian daal, which uses lentils as the base ingredient.  This dish can be vegetarian or you may add bits of pork cubes or some dried salted prawns for flavour. You can add chillies for the extra kick or some leafy greens like chilli leaves, bok choy or spinach leaves for colour and the extra vitamin D.  


To make this dish, you'll need

1 cup mung beans (usually sold in Asian supermarkets)
1 medium sized onion, diced
1-2 pieces tomato, quartered
2 cloves garlic minced
100g pork cubes/minced or 5g dried salted prawns
fish sauce for seasoning


Boil the mung beans (in enough water) in a saucepan until soft.  May take 30-45 minutes. If the water dries up, add a few cups more water.)


In a skillet or shallow pan, saute the onion and garlic until soft, then add the tomato. Stir until the tomato is soft.  Season with fish sauce (2-3 tbsp, taste as you go as different brands of fish sauce have varying saltiness).  Add the cooked mung beans and simmer for 10 minutes.

Best serve with boiled rice.  


This version includes some chopped chillies.


This version includes some chopped strips of pork belly fried until crispy before adding the mung beans.

Bean sprouts are grown out of mung beans left soaked in water for a week or more. Bean sprouts are usually sauteed and serve as sides in terriyaki dishes, or served fresh with hot Vietnames pho soup.

Monday, August 22, 2011

Beef kare kare

“Part of the secret of success in life is to eat what you like and let the food fight it out inside.” - Mark Twain


This is one of my all time favourite Filipino dishes.  It's not a regular dish in most Filipino households, but it is a regular on special occasions.  Birthdays, having guests from overseas, anniversaries, etc.  I guess because the preparation takes time.  When one decides on preparing kare-kare, it has to be a massive production. Really.  It needs a big pot, about 1-2k meat plus vegetables.  So its not really practical for those weekday lunches or dinners.  Plus, the ox tripe takes a bit of time cooking.  Kare-kare  which is classified as stew, is originally cooked with ox tail and sometimes also includes ox tripe.  But with today's lifestyles and variety of meat cuts, the Filipino ingenuity strives to make this dish with any meat cut available and sometimes even with seafood.  Besides the laborious hours of tenderising the ox tripe, real kare-kare makes use of ground peanuts. The home maker who has time will buy roast nuts from the market and have this grounded. So that's additional time.  So it is in fact, a massive production.


Kare-kare mix - sold in most Filipino and Asian shops

But not in our home. We prepare this on a whim.  Usually on a weekend.  To feed the adults' craving for kare-kare.  And because of the availability of special mixes, this is not a hard task to take on.  And the best part, the side which is ready-made shrimp paste.  The thought of eating a beef dish with shrimp paste may sound appalling. but hey!  This is one of many dishes in the Philippines which is truly and uniquely Filipino. Although there are some attributes that compare this dish to Indian curry and sometimes the Indonesian gado-gado.  


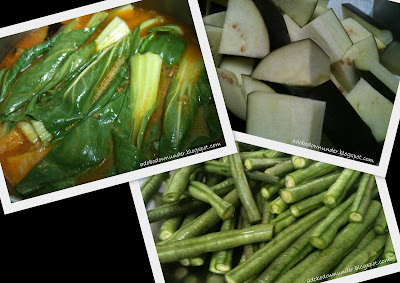
Veggies for the kare-kare: Aubergines, snake beans, bok choy


To parepare this kare kare, we used:

1.5k beef ribs
4-5c water
2 cloves garlic, minced
1 medium onion, quartered
1 bunch snake bins, tips removed, cut into 6-7cm
1 aubergine or large eggplant, cut into wedges or 2cm thick discs
2 tbsp creamy peanut butter


Using a large pot (to fit the meat and veggies), braise the beef in enough to. Bring to a boil, skimming every few minutes, and simmer until tender.  May take 1-2hours in low simmer.

In another sauce pan or pot, saute the garlic and onion until soft.  Sear the beef until brown.  Add 2-3 cups of the stock and the kare-kare mix and peanut butter.  Turn heat to medium and simmer for 10 minutes. 

Add the aubergine/eggplant and snake beans and continue to simmer for another 10 minutes until the vegetables are cooked.  Add the bok choy, cover and turn off heat.


Kare-kare!  Served and eaten with rice and the sauteed shrimp paste


Served on the side - sauteed shrimp paste

Saturday, August 20, 2011

How to make boiled egg with runny yolks

I've just thought about this lately.  Kitchen and cooking tips and tricks learned through the years, and some passed on from experts, not necessarily from the culinary world but also from family members who have gained the knowledge through years and years of experience.   So this is a first.  A series of "how to's". 


Tip # 1 - How to make that boiled egg with runny yolks for that Caesar Salad garnish/topping

Heat a small saucepan with enough water to submerge the egg.  Bring the water to a boil.  Add the egg/s as soon as the water boils and cook for 5 minutes.  Take the eggs off and place in a bowl with cold water, to stop the cooking process. Once cool, carefully peel off egg shells (the egg white will be cooked but quite soft so be gentle) and slice in half.  Place on top of the salad. 


Ta da!


P.S - As with all recipes and experiences here, I do not profess to be an expert in the kitchen, but these are tricks that we're passed on to me, some learned, and ALL of which I use when cooking and in the kitchen.


Thursday, August 18, 2011

Cinnamon rolls in coffee-vanilla icing


Thanks to the Pioneer Woman, I now have a good following of fans.  Cinnamon roll fans that is.  I must make more of it and maybe run as a local member in parliament!  Well not quite that big in terms of network.  But at least in the small corner of the government agency where I work.  Slowly, I will infiltrate the cinnamon rolls business and expand.  Good plan. Big bucks!  Mwa ha ha ha!   I took PW’s suggestion.  Make these and spread the love, amongst your family, friends and accolades.  And among other things, you will be worshipped by worthy followers!  


I love Ree Drummond’s blog.  She’s so candid and funny, and the fact that she lives in a farm and wearing boots and a cowboy hat at most times, makes me love her more.  I admire women who live ins farms, keeps a home, and still have time to keep the kitchen humming to feed a family!  And she does!  With great passion!  And that’s how she is – the pioneer woman.   Of all places, I discovered her blog through Pinterest.  A saw these lovely buttered rosemary dinner rolls and I knew I just had to make it.  It took some time to hunt her down because it was a photo repinned by someone else, who got it from someone who also repinned it and so on…..  but it was all worth the hunt.  Because besides discovering her recipe for the buttered rosemary dinner rolls, I also found this 101 on cinnamon rolls  including some notes and so many more glorious recipes, all flagged/bookmarked for those weekend and school holiday cooking projects.  There's an exciting world of foodies out there!  


Dough
4 cups full cream milk
1 cup vegetable oil
1 cup caster sugar
15g (about 2 and half tbsp) active dry yeast
8 cups all purpose flour + 1 cup extra
1 tsp baking powder
3/4 tsp (scant) baking soda
1 (heaping) tbsp table salt


Filling
50g butter, melted
ground cinnamon (no limit to your sprinkling ability)


Icing/Glaze
1 - 500g pack icing sugar
1 tsp vanilla essence (we don't have maple flavouring in Oz)
1/4 cup very strong coffee
50g melted butter

To make the dough, heat the milk, vegetable oil and caster sugar in a large pot  (keep in mind that the 4-cup flour/dough will rise in this same pot, so use a big one) until just before boiling point.  Stir the mixture a bit to dissolve the sugar.  Turn off heat and let it cool - 45 minutes to 1 hour.

When the mixture is luke warm (not hot), sprinkle in the active dry yeast.  (Do not stir at this point).  Let it sit for a minute.

Add the 8 cups flour and stir to combine.  Cover and let sit for an hour.

Add the extra 1 cup flour, baking powder, baking soda and salt and stir together.  The dough will be wet and sticky.  

PS - At this point, PW suggests two things: you can either 1) proceed to making the rolls, or 2) keep the dough in the fridge overnight or a day or two, until you need it.


To make the rolls, get half of the dough and roll it into a rectangle on a lightly floured surface until about 2mm thick. 

Brush the rolled dough with butter then sprinkle with ground cinnamon.  (I found that the melted butter was oozing out of the sides as we rolled the dough, so maybe next time, we'll just brush it with softened butter)

Starting from the opposite end, roll the dough towards you, keeping the dough tight as you roll.  Pinch the seams to seal the edges.

Cut the dough into 3/4 - 1inch thick rolls.  Lightly butter 3 round 8in cake tins(we bought foil cake tins for this).  Place the rolls neatly spaced in the tins and let it rise for 20-30 minutes.

Bake in a 180 degrees C pre-heated oven for 15-20 minutes, until golden.


To make the glaze, combine the icing sugar, melted butter, vanilla essence and coffee in a large bowl and whisk until smooth.

Spread on top of the warm cinnamon rolls, then spread happiness all around.


I have made cinnamon rolls before, but this one is spot-on easy in terms of its one-pot dough wonder.  You heat the milk, sugar and oil in a pot.  Add the yeast and flour and rest!  How easy is that?!  Of course you need a little elbow grease when you add the flour as it becomes a sticky gooey mess, and you only use a wooden spoon.  But that’s about it.  After resting, a little of effort on rolling the down and then spreading it with love – butter, sugar and cinnamon!  Cut into 2cm thick rounds and arrange in a dish and bake away!  A few more minutes of waiting and what you’ll have is your ticket to stardom!  Delicious melt-in-the-mouth cinnamon rolls with that coffee flavoured glaze.  Serious business.


We made this one weekend, and I’m just lucky that the girls are always keen and ready to help with whatever.  Whether its just getting the ingredients off the pantry, cracking eggs into a bowl, stirring a gooey sticky dough, or washing up. Well, pretending to wash up while playing in the kitchen sink.  All help is always welcomed and appreciated. Well, you can't possibly think there's no mess behind all these cooking, do you?  Even the Pioneer Woman agrees!


Tuesday, August 16, 2011

Giant Oreo cookie (aka No-bake Oreo cheesecake)


I read a lost-in-translation-question raised in the BBC Food Blog Message Board through David Lebovitz' FB page about how much detail should recipes come in these days.  Whether ingredient names from where the recipe is written should include, whatever else they are called elsewhere, e.g. cornstarch in the US are known as cornflour somewhere else and maize starch in some other places.  Because of the accessibility of recipes these days from the net, everyone can jump on a recipe and try it at home.  But it shouldn’t stop there.  I think the benefit and beauty of technology is that the answer to whatever recipe question, (I know, such a cliché!) is at our fingertips!  Literally!  How much is a pound of ribs?  How much is 300 degrees F in Centigrade?  How much is a stick of butter or a sachet of dry active yeast, or a bag of icing sugar?  Would one really post a question out there and wait for an answer?  Rather than searching for it themselves and getting the answer upfront – in a few searches, give or take a few minutes?  The exciting thing about cooking these days is the availability of recipes, ingredients (even hard to find ones can be sourced online), gadgets, utensils, equipments all at our fingertips!  There are even videos out there showing step-step procedures for just about anything.  So, if you have a question, search for it!  Seek and you shall find!  Unless you don’t have access to Google, then maybe you can phone a friend?


This cheesecake, has got to be, the easiest sweet thing that ever came out of our kitchen!   Thank God for food processors!  And also for dishwashers, of course!


This no-bake Oreo cheesecake is adapted from the Kraft Recipes page, but was changed a bit to include gelatin in the mixture.  I was inspired to make it after seeing it from Cook My Way but found another version from Baking Mum where the recipe for gelatin was more precise (i.e. first one says 2 envelopes gelatin - exactly my point above!) I've revised the recipe a bit to include quantities and ingredients that works for us. 


50g butter, melted
1 - 150g pack Oreo classic cookies

1 - 250g pack Philadelphia Cream Cheese
1/2 cup caster sugar (less than what both recipes called for)
1 - 10g sachet unflavoured gelatine (dissolved in 1/4 cup boiling water)
2 tbsp lemon juice
1 cup thickened cream, lightly whisked
100g (approximately 9 pieces Oreo cookies), crumbled for filling
50g Oreo cookies, crushed, extra for topping (optional, but you can't call it a giant cookie without this topping)


Crust - looks like wet dirt :)

Crush a whole 150g packet of Oreo cookies using a food processor (or if you don't have one, there are other ingenious ways to crush cookies)

Mix the butter and crushed cookies together to form the crust.  Using the back of spoon, press onto a lightly oiled 8inch spring-form cake pan.  Chill in the refrigerator for 20-30 minutes, while you're preparing the cheesecake filling.

Beat the cream cheese and sugar together using a stand-mixer or hand-held beater, until smooth. Add the gelatine mixture, lemon juice and cream. Using a spatula or metal spoon, mix until all combined.

Add the crumbled Oreo cookies and stir until evenly combined.

Pour the cream cheese filling into the prepared tin, smooth the top.  Return to chill for 20 minutes in the fridge to settle the cake.  

Top with the extra crushed Oreo cookies and return to chill for a few hours before serving, or overnight.


The cheesecake batter - looks yummy already!  Looks like cookies and cream ice cream.


I've made this twice over 2 days.  One was brought to the office morning tea.  The first attempt was too sweet using the 3/4 cup sugar.  The second attempt we had for our Sunday lunch dessert, was a better version.  Not too sweet, and the cheesecake just right.  Even our neighbour agrees. I brought them a few slices as treats.


The crumbled Oreo cookies in the filling adds that beauty to the cake!


This is best taken out of the refrigerator a few minutes before serving to soften the crust a bit.  The crust does tend to toughen with that butter in there. 

Saturday, August 13, 2011

Smoked salmon canapes


I love cocktail parties!  My former employer used to host so many of these parties it was a highlight amongst office colleagues every year. We'd have our dresses custom made and a week before, we'd be so busy we'd be off shopping every lunch break.  But that was ages ago, and to this day, if I'm asked to host a party, I would choose cocktail style.  Canapes and hors d'oeuvres, champagne and wine, music and dancing and non stop socialising.  It was actually in one of these cocktail parties that hubby and me formally clicked.  We danced the night away!

In Kitchen 10, we are closing in on our lessons on Salads, Sandwiches and Appetizers.  And canapes and hors d'oeuvres were the order of the day this week.

This is a super easy one which can be used in any kind of party.  Cocktail style or just a simple appetizer.

1 pack smoked salmon (supermarket variety)
1 telegraph cucumber, sliced in thin discs

150g cream cheese

bunch of parsley, minced finely

toasted bread (any variety, but I find the French baguette sliced in half-inch thick or the store-bought mini toast varieties)


Mix the cream cheese and parsley and season with some salt and pepper.  Some bit of colour such as paprika or cayenne pepper for that colour also works.

Toast the bread and shape into rounds using a cookie cutter (if not using the mini toasts)

Spread the cream cheese on the shaped toasts (or mini toasts) and top with a slice of cucumber.

Place a tiny dollop of cream cheese on the cucumber.

Curl some salmon slices and place on top of the cream cheese/cucumber. (we did this because Chef A had to drizzle/pour some aspic* on top of the canapes to create that glossy look)

Chill in the refrigerator before serving.


In class, Chef A drizzled some aspic on the canapes to add that gloss and chilled them for a good half hour before bringing them on to the waiting customers at the Ambassador Restaurant downstairs from our Kitchen 10.  There was a function at the time, and they actually needed 40 pieces.  But since aspic is something that's used only in commercial kitchens, if you're preparing this for a private party at home, the aspic may be omitted.


A short note on aspic
Aspic is a gelatin mixture made from meat stock such as consomme. It is usually used to help mold, shape and create that glossy certain dishes.  We used some aspic to top our chicken liver pate in Lesson 2 and Julia Child included a significant piece on the humble aspic in her book Mastering the Art of French Cooking.  While it might be worthwhile to try and make your own aspic at home (like Julie Powell did in Julie and Julia), there are aspic powders available in the market today, mostly used in commercial kitchens.

Friday, August 12, 2011

Baby back ribs in ginger-orange glaze


I've never tried making my own glaze or sauce for a barbeque before.  This was a first. And now I'm thinking of making more and bottling them, and selling them!  Seriously!  Because they are absolutely great!   The golden ticket of barbeque ribs! This recipe is adapted from Jaden Hair of Steamy Kitchen.  I've tried this over the weekend, including her fall-off-the-bone tip and what a turn out!  Serious baby back ribs, and literally fall-of-the-bone ribs, with a sweet and spicy Asian glaze.


These are the best ribs I've ever cooked at home! Most ribs we grill always end up marinaded for a few hours then on the grill.  Great for those spontaneous what-should-we-have-for-Sunday-lunch-barbeque?  On the other side of the fast and furious is this.  Slow and tender cooking (3-4hours) with some passionate smearing of spicy-sweet-orange glaze. And if you don't like the sweet and spicy orange glaze, you can still use your own favourite supermarket variety.  But do the 3-4 hours slow cooking process, because it'll change your life forever. The next time you'll have a backyard barbie, you can have this in your repertoire and your guests will definitely be impressed.


Pat dry the 1.5-2k pork baby back or rack ribs (American ribs as called in local butchers) with salt and pepper.  Place on a roasting tray or dish, cover with aluminum foil and place in a 150 degrees pre-heated oven for 3-4 hours. 


To make the glaze

1 tsp grated ginger (1 thumb-sized nob)

3 cloves garlic, minced

2 small eschalot , minced (Also known as shallots - see onion varieties here)

3/4 hoisin sauce (I used up a whole jar 240g Lee Kum Kee jar)

1 large orange, zest and juice

1 tbsp mirin

1 tbsp sambal

2 tbsp lemon juice

2 tbsp vegetable oil


Heat a small skillet or saucepan.  Add the vegetable oil and saute the onion until soft, 2-3  minutes.

Add the garlic and ginger and cook for another minute.

Add all the ingredients except the lemon juice (Jaden uses yuzu sauce but mentioned that lemon can be a substitute).

Lower the heat to low and simmer until sauce thickens, 8-10 minutes. 

Remove from heat and add the lemon juice (and some more ginger for extra punch).


We had this for dinner over the weekend, served with rice or rosemary buttered dinner rolls option, and simple side salad.  This dish is definitely making an encore in the next get-together.  I might make this a staple-plate-to-bring for those lunch and dinner invitations.  


Thursday, August 11, 2011

Maja Blanca Mais by Tita Emma


This is another main character in my family’s Christmas lunches and dinners.  Usually held at my grandparent’s place, aunts and uncles will be bringing a plate to share and this is my Tita (aunt in Filipino/Tagalog) Emma’s traditional dessert plate.  I’ve made two versions of this maja blanca for our Christmas in July feast.  One I found online through Panlasang Pinoy which had more of the coconut milk (white version), and my Tita’s version which has more corn (yellow version).  I believe this dish has evolved in the Filipino culinary environment where Maja Mais (corn) was born, out of the Maja Blanca original (where there were no corn in the preparation).  I’m not sure how and why this dish has carried on a name which obviously mimics a Spanish origin, but closely resembles the Chinese dessert dish of Steamed Coconut Pudding.


Anyway.  This is another Filipino dish which was been a result of the many cultural influences that have resided in the Philippines during the early 1900’s.  As to how old this dish is, I can only guess.  But I know for sure that this dish has been in our Christmas and New Year menu for more than 30 years.

Two versions for whatever you fancy.  More coconut or more corn?  Why not make both?!


Tita Emma's Maja (Mais) Blanca

2 cups evaporated milk

1 cup coconut milk

1 cup sugar

1 cup cornstarch

1 cup milk (fresh or whole milk)

1 410g can cream of sweet corn

In a medium sized pot boil the evaporated milk, coconut milk and sugar and stir to mix through and dissolve the sugar.  Turn heat down to a low simmer.

Add the cream of sweet corn and stir.

In a large bowl, whisk the cornstarch into the milk until dissolved. Add this into the pot of warm coconut milk mixture and stir until the sauce thickens.   (The mixture will appear lumpy and that's fine.  The consistency is like a thick pudding.)

Pour the coconut and corn mixture into a medium-sized rectangular dish and let it cool.  Chill in the refrigerator for at least 1 hour.

Top with toasted shredded coconut (latik). 


To make Panlasang Pinoy's version,

4 cups coconut milk 

1 420g can sweet corn whole kernels

3/4 cup caster sugar

1 395g can condensed milk

1 cup fresh or whole milk

1 cup corn flour

In a large pot, bring the coconut milk to a boil.  

Turn down to medium heat, then add the sweet corn kernels, sugar and condensed milk and stir and return to boil.

 Add the milk and cornflour and stir until the mixture is thick and a bit lumpy.  (Again, its okay if it gets lumpy as you want a thick pudding consistency and texture.)

Pour into a large rectangular dish and cool. Chill in the refrigerator for at least an hour then top with toasted shredded coconuts before serving.


PS - For the toasted shredded coconut recipe (latik in Filipino), see my recipe for Suman sa Lihiya. The same kind can be used for topping on the Maja Blanca.

Wednesday, August 10, 2011

Chicken strips in Shish Tawook spice


One of the greatest things about Australia is the food. It is like the United Nations here!  The food is as vast and diverse as the many cultures that have made Australia their second home.  And its great to discover little things such as a spice that speaks a certain culture.   This was through a taste test kiosk at the local shops – chicken strips marinated with Sami’s Kitchen Shish Tawook Spice and grilled on a pan.  It tasted great at that tasting table, and it smelled and tasted the same at home.  The house smelled so good.   I could almost imagine how the neighbours felt.  I’m pretty sure they could smell it for miles! 


We road tested this at home, pan fried using a shallow skillet/fry pan and used these ingredients:
500-750g chicken breast, cut into strips
3 cloves garlic, finely diced
2 tbsp Sami's Kitchen Shish Tawook spice
2 tbsp olive oil
1 lemon, juice

Combine all the ingredients and let it sit/ marinade for 30 minutes.  Heat pan and cook chicken strips until done (about 5-6 minutes).  You can choose to cook the strips one by one, or in one go (all the chicken in the pan at the same time), but you’ll be squishing the pieces and could possibly stick together.


Option – use barbeque sticks and skewer the chicken and use a grilled pan and cook stove top, or the oven grill, or the barbeque grill in your backyard.  I seriously feel this is also great for barbeque lamb skewers.  The spice actually tasted just like our neighbour prepared in one of those dinners we had at their place.  Really good spice.

If you can’t find Sami’s Kitchen spice, this shish tawook is actually just a combination of the following:  ground garlic, paprika, thyme, nutmeg, pimiento, cinnamon.  Or you can buy Sami’s Kitchen products online.


PS – This is not a paid endorsement.  (Nothing ever is on this site)  This is something we bought, tried, cooked, ate at home, and liked it so much, we want friends and family to know. 

Monday, August 08, 2011

Dark chocolate orange fudge cake by Haigh's

A great empire, like a great cake, is most easily diminished at the edges.  - Benjamin Franklin


After that Sticky weekend, we were off to the city to counter all the sweets consumed the previous week!  It was the bi-annual general dental check up and cleaning.  I tell you.  I do have a way with planning and organizing.  All those years (ancient times!) in the corporate environment has honed my KPI assessing skills and my strategic planning prowess.    While a weekend was spent in a cavity-inducing activity, the next weekend can only follow one path.  And that is to road to dental salvation.    And while I can save my girls’ pearly whites, there is actually a second motive after our dentist trip.  And that is a few steps to cross  George Street onto The Strand Arcade, and into the open doors of Haigh’s.  I must admit though, that I am a compulsive chocolate hoarder.  A mild one.  Because we don’t have a pantry full of chocolates.  But I seem to bend over when chocolates are infront of me, especially those kinds that we don’t really see in supermarket shelves.    The special kind.  Haigh’s is definitely my kind of store. 

This is the first time that I’m trying on a chocolate cake mixed with some other food item.  I’m a simple chocolate cake kind of gal.  Less ingredients, simple method, the better.  But I found this recipe and while we still had an abundance of Australian navel orange, a road test was in order.  Let’s see how good this chocolate-orange combination is. 
  

Dark Chocolate Orange Fudge Cake adapted from Haigh's 
For the cake:
3/4 cup cold water
finely grated zest and juice of 2 oranges
2 drops orange essence  
(I substituted this with lemon essence as its not available within the 25k radius of our suburb)
250g unsalted butter
2 cups caster sugar
200g Haigh's Dark Couveture Chocolate
1 and 1/2 cups plan flour
1/4 cup cocoa powder
2 eggs, lightly beaten


Combine the water, zest, juice, essence, butter, sugar and chocolate in a saucepan.  (Photo above.  Yes, it looks like a big mess, a hodge-podge kind of mess, especially the water and butter are both cold.  But don't worry at this point. Just follow the instructions.)


Heat gently until chocolate has melted and sugar has dissolved. (It will look better at this stage.  Look.  Smooth consistency.  Just what you want.)


Remove from pan and allow to cool slightly.  (Vague, so here's an estimate.  About 5-10 minutes, depending on the season.  It's winter so that took shorter than 10 minutes.)


Whisk in sifted flour and cocoa. (To do this, simply place a fine mesh strainer over your saucepan, and pour your dry ingredients as mentioned, then whisk away.)    Stir in beaten eggs.

Pour batter into a lined 22cm spring form pan.


Bake at 175 degrees C for 75 minutes or until cooked (when you insert a skewer, it will not come out clean but should have some bits and pieces of the cake as this is a fudge cake.)


Allow to cool before icing.
Jaffa Icing

1 cup Haigh's Dark Couveture Chocolate, roughly chopped (about 120g)
1 cup cream
2-3 drops orange essence (again, we used lemon essence)
zest of 1 orange

Melt together chocolate, cream, essence and orange zest in a bowl over simmering water, until smooth.

Allow to cool and thicken in the refrigerator (45 minutes to an hour). Spread thickened icing over cold cake and serve.


The method in itself is simple.  I am one for baking recipes that do not require softening the butter at room temperature.  This is the melt-in-the-pan kind.   The cake overall was as it is named – dark-chocolate-orange-fudge.  It is a rich heavy cake, but the hint of orange balances it all.  The jaffa icing blends well with the cake.  This cake is sophisticated and demure.   Its not the kind of cake you’d want another slice like regular chocolate or sponge cakes.  The richness of the fudge gives you that content feeling.  And the whiff and taste of orange gives you that balance of sweet with fresh.  Served with whipped cream, it is a perfect match. 


All gone!


LinkWithin

Related Posts Plugin for WordPress, Blogger...